ArticlesArticles LoginLogin
DrillDown Icon Table of Contents
DrillDown Icon Center Network Systems
DrillDown Icon Lane Components
DrillDown Icon Lane Maintenance
DrillDown Icon Brunswick A22
DrillDown Icon Brunswick Computer Lane Monitor
DrillDown Icon Brunswick Envoy
DrillDown Icon Battery Charger
DrillDown Icon Custom Battery Charger Settings for Lithium Battery
DrillDown Icon Envoy Conditioning System
DrillDown Icon Envoy Electronics
DrillDown Icon Envoy Tracktion Drive, End of Lane & Encoder Sensors
DrillDown Icon Graphical User Interface (GUI) Envoy
DrillDown Icon Brunswick Phoenix Lite
DrillDown Icon Incorrect Pressure Readings or No High Conditioner Pressure Warning
DrillDown Icon Low or High Pressure Errors on Brunswick Lane Machines
DrillDown Icon Phoenix Lite
DrillDown Icon Phoenix Lite Model B
DrillDown Icon Phoenix LT4
DrillDown Icon Networking
DrillDown Icon Pinsetters
DrillDown Icon Scoring Systems
  Subscribe Email This ArticlePrint PreviewPrint Preview Current Article/Category with all Sub-Articles/Sub-Categories
 
Custom Battery Charger Settings for Lithium Battery
Environment:
Charging System, Lithium Battery
Applicable Version(s):
 Envoy Lane Machines with Lithium Batteries
Procedure: Instructions for selecting Custom Battery type and Custom Settings for Lithium Battery Charging.

Important: Please read instructions completely first as the charger will shut down after 30 seconds of idle anytime during this process and you will have to restart this procedure.

Disconnect the charger from the side charging port of the Envoy lane machine to make this adjustment and turn on when adjustment is completed.

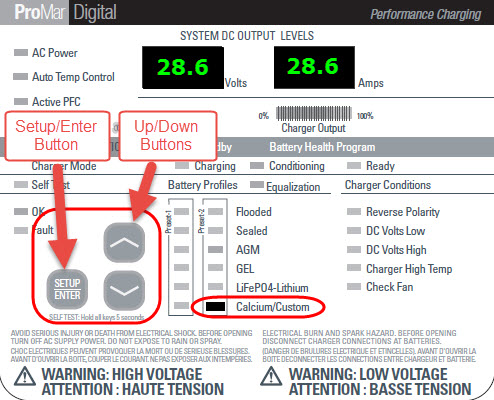
1. Press and hold the Setup/Enter button for 5 seconds. (See Figure #1) 

2. The current battery type and Voltage/Amperage displays will flash.

3. Using the up/down arrows (See Figure #1) move the selected LED light to Preset #2 Calcium/Custom.

4. Once set to Preset #2 Calcium/Custom both the Volts and Amps and the Charging and Conditioning LED’s will begin flashing.

5. Press the Setup/Enter button. The display should now show the Volts flashing and the Amps display blank. Press the up arrow button to move the voltage to 28.6 volts.

6. Press the Setup/Enter button. The Amps display will flash and the Volts display will be blank, the Ready LED will also be flashing. Press the up arrow button to move the Amps to 28.6 Amps.

7. Press the Setup/Enter button to lock in the settings. Your charger is now ready to operate.

Figure #1


Note: During this process, real-time voltage and amperages will not be displayed until after you press the “Setup/Enter” button in step 7. 

Some chargers may have up to a 0.2 volt difference in the real-time voltage readings.  Example, if set for 28.6 the real-time voltage results could be 28.8 volts. 


Revision Date:
08/04/2021 - Added details regarding charging process.
06/01/2017 - Released to KB

 
Modified 8/4/2021
Article ID: 1324