|
This procedure will show how to remove and replace the
injector rail along with replacing the heater element. There are times when
lane cleaner or other liquids are introduced into the conditioner tank by
accident and the injectors on the injector rail can become clogged and cannot
be cleared out by the injector blow out procedure.
This procedure should also be followed when replacing the
heater element if it fails. The heater replacement instructions are at the end
of this injector rail replacement instructions.
Tools Needed:
Phillips screwdriver
3/8” Closed/open end wrench
3/8” Socket with 3/8” ratchet
6” to 10” 3/8” extension
Small screwdriver or painted screwdriver
Permanent marker for marking the injector cables
Extension hose from your spare parts kit
Screwdriver big enough to fit into the Cord Kill Stud Assembly to hold it in
place
3/8” and 1/4” plastic caps for hoses
To start we need to de-pressurize and empty all the
conditioner and cleaner from the conditioner and cleaner tanks.
See Section #6 Maintenance & Service
See Page # 130 for
De-pressurizing the Conditioning System
See Page # 131 for Draining the Conditioner Supply Tank
See page # 126 for Draining the Cleaner Supply Tank
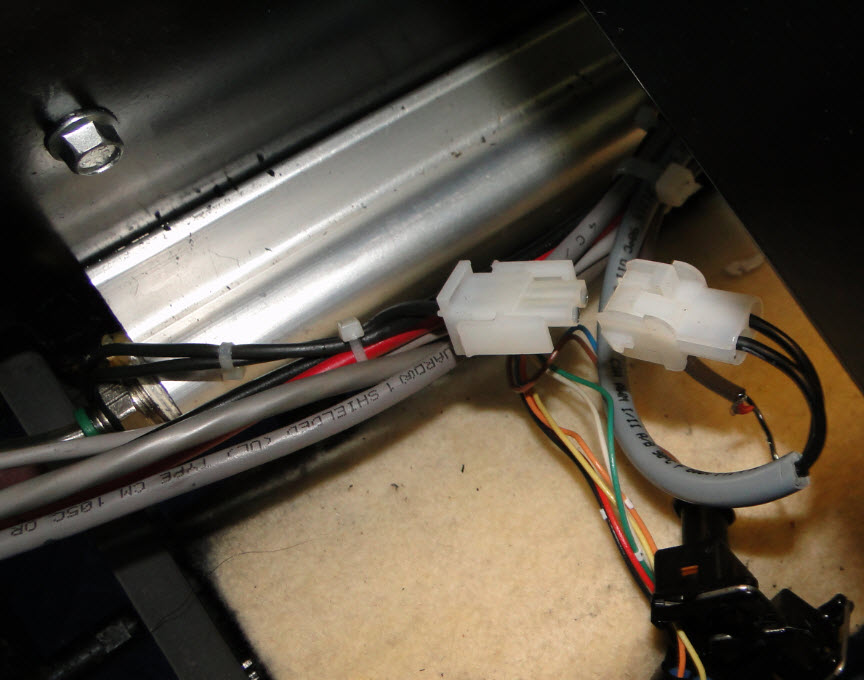
1. Remove the electrical enclosure from the machine.
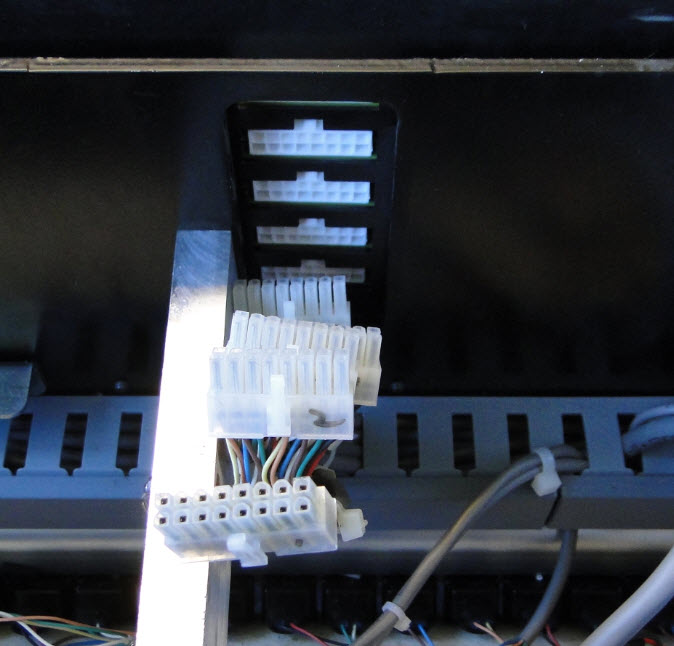
2. Disconnect all the connections from both RH and
LH side of the electrical enclosure.
3. Remove the GUI, and then remove the
injector cables that are below the GUI screen that route through the center
wall off the machine. Mark these 1-5 so that they can be reinstalled the same
as removed.
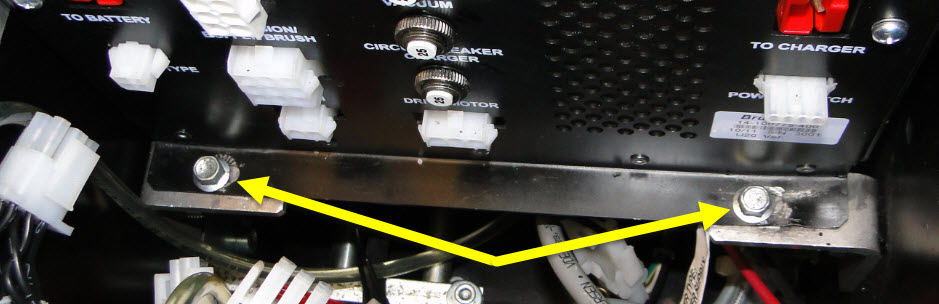
4. Remove the 4 each 3/8” socket head bolts that
mount the electrical enclosure to the 4 “L” brackets.
5. You should be able to now lift the enclosure
straight up and out of the machine and set aside.
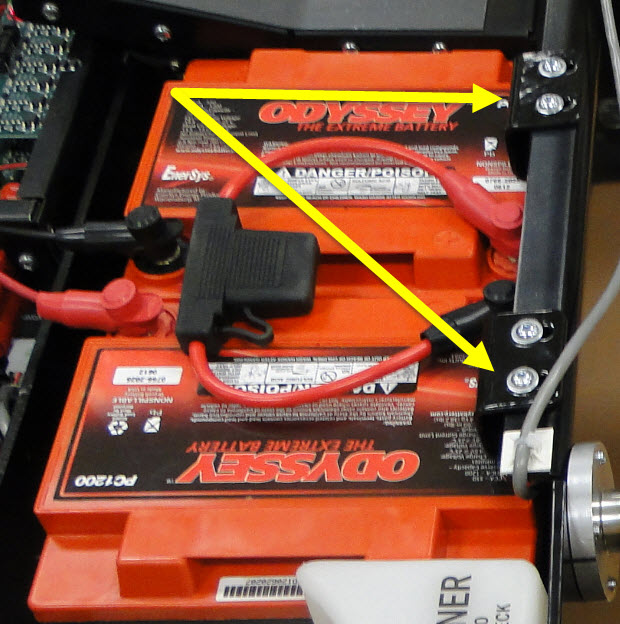
Next, we need to remove the battery and its tray.
6. Remove the two battery clamps.
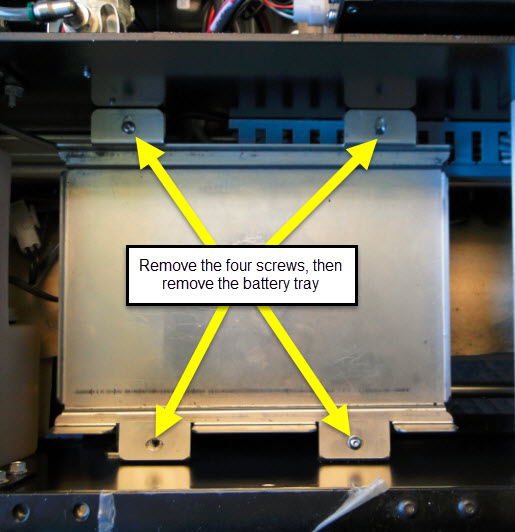
7. Remove the bottom battery tray. There are four
hex cap screws holding securing this plate.
Now, we need to remove the conditioner tank.
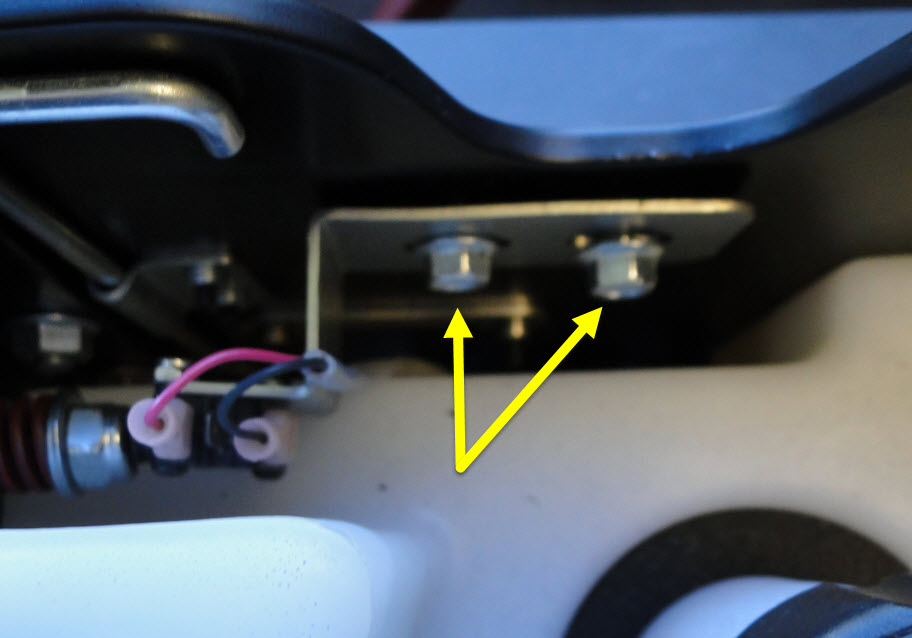
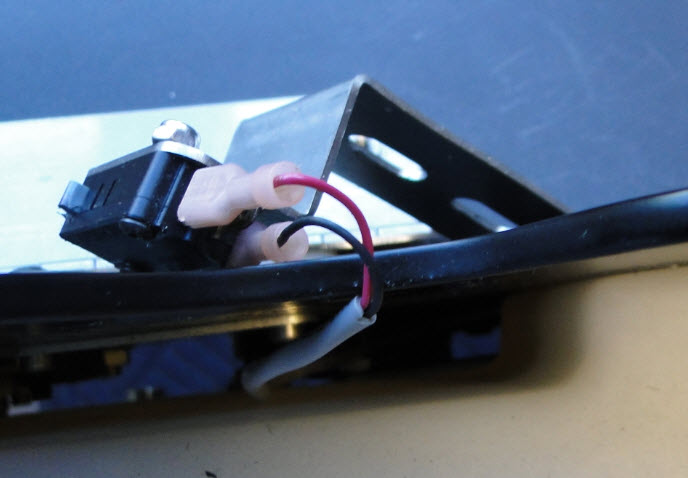
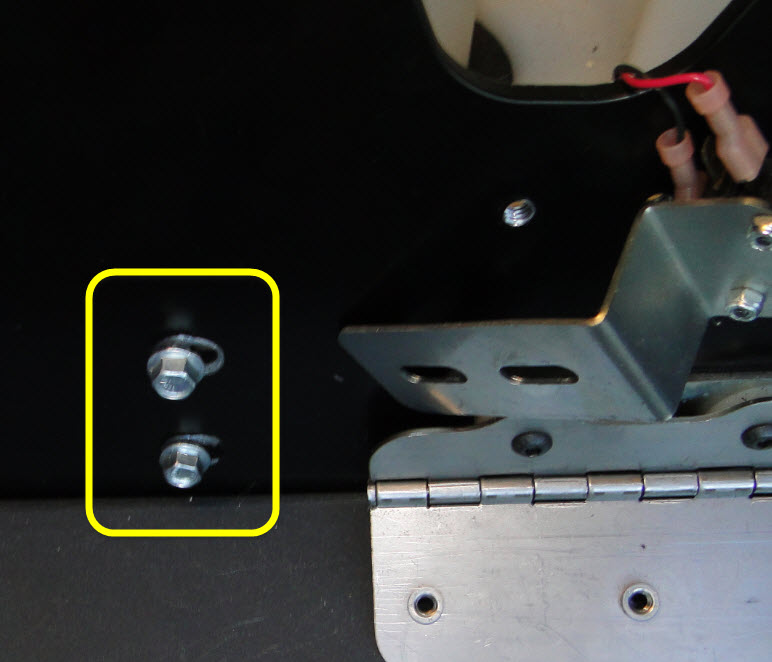
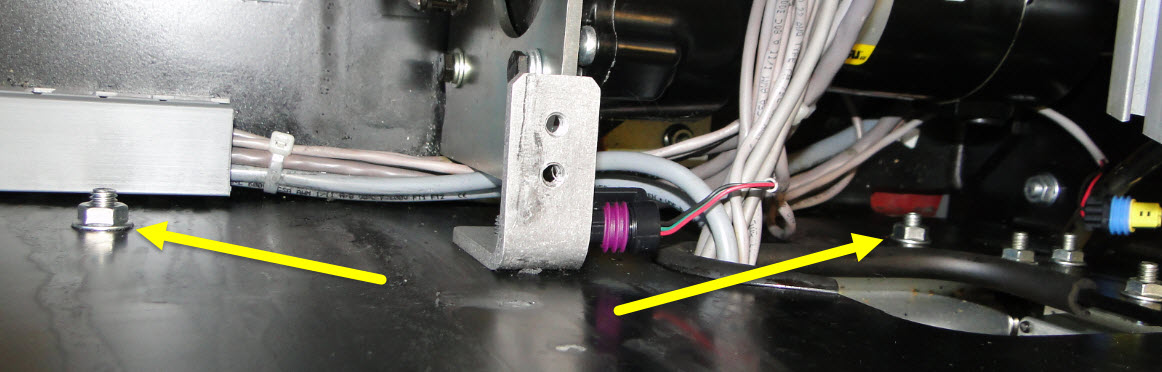
8. Remove the cord kill micro switch bracket by removing the two 3/8” bolts that mount the switch and lay the switch and bracket
over the wall out of the way.
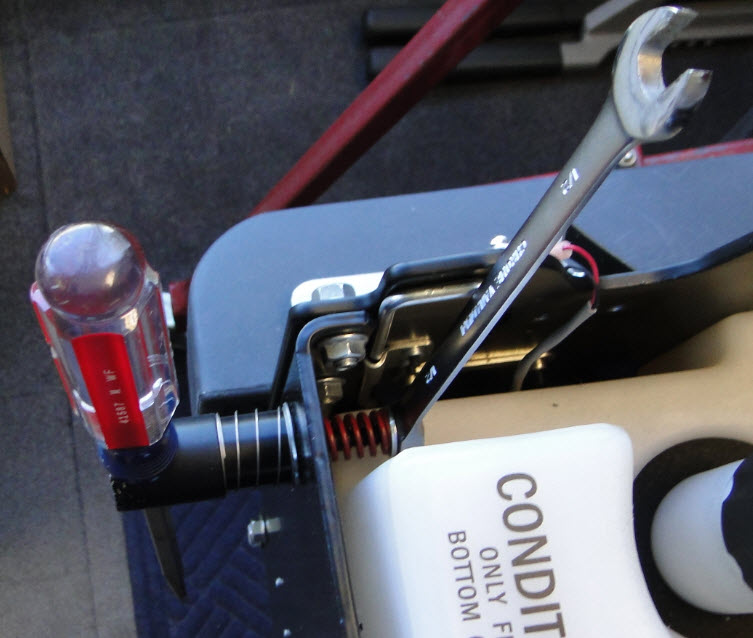
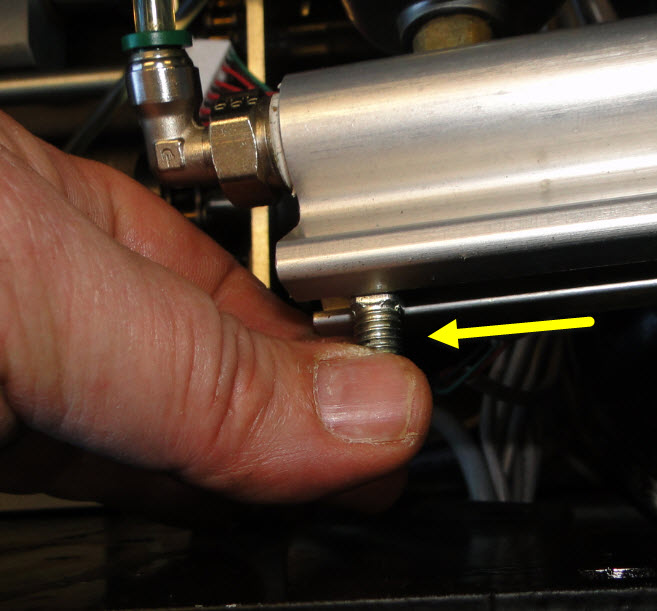
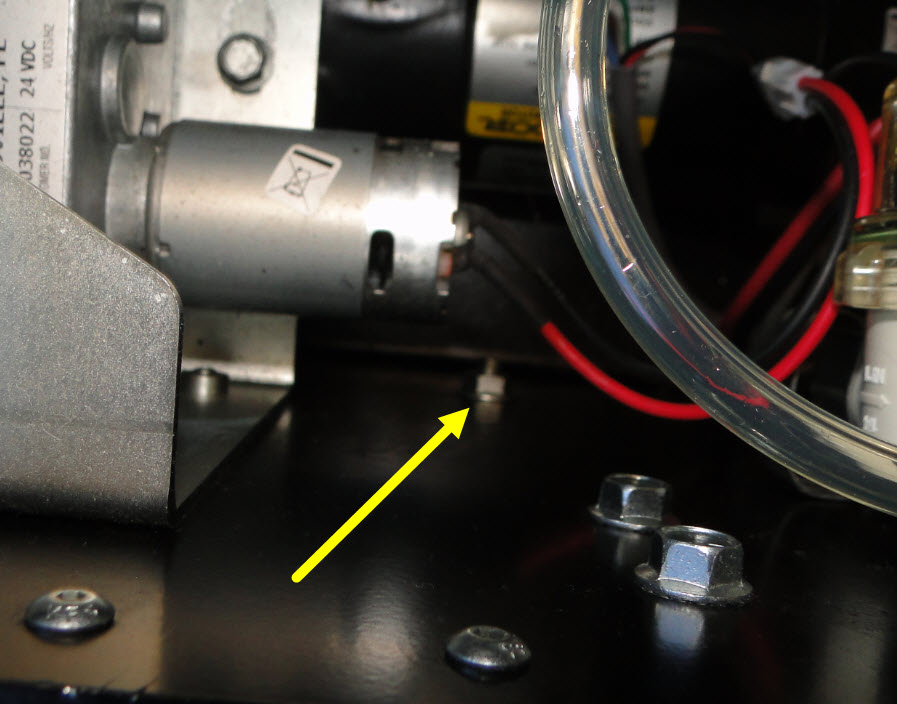
9. Remove the cord kill stud assembly. Use a
large screwdriver to put in the slot where the cord ring would normally go. Then, using a 3/8” closed/open end wrench, start unscrewing the cord kill stud
assembly and remove with the washers and spring. Place all parts back together.
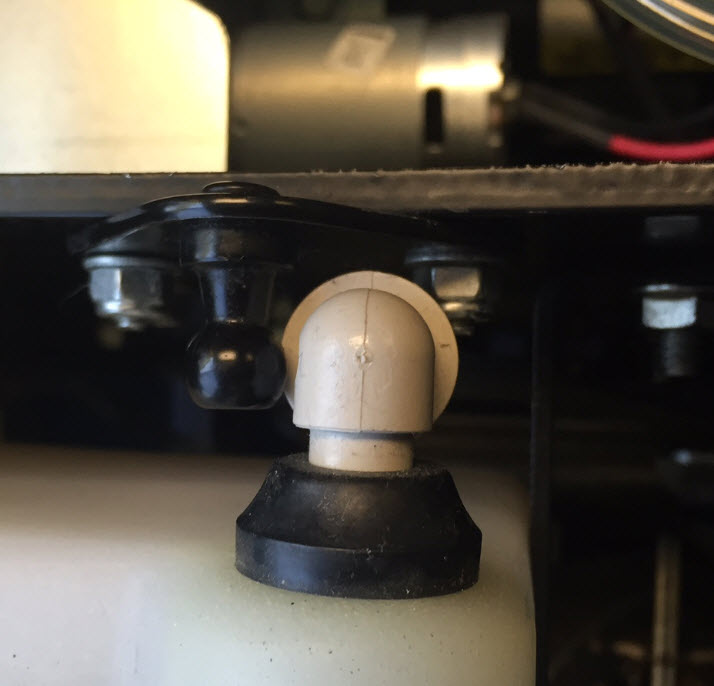
10. Remove the gas spring shock at this location, take a small pocket screw driver and push the clip outwards to unsnap the shock from the ball.
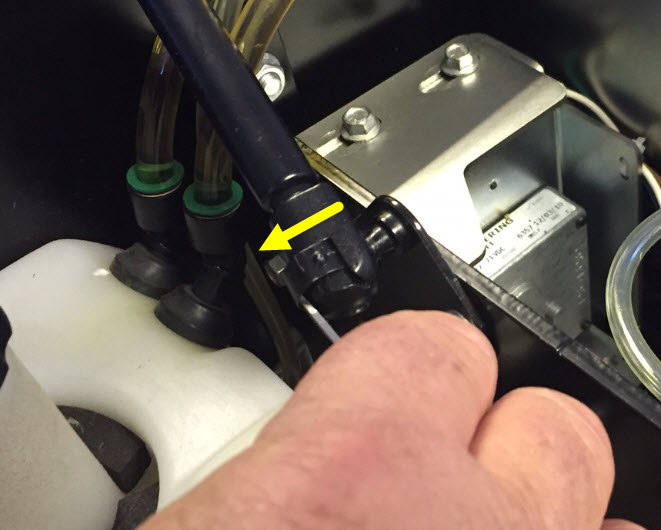
Note: Remember to de-pressurize the conditioning system and
drain the system before you remove the hoses!
11.
Find the two conditioner tank mounting bolts on
the side of the machine and remove these. You will need to remove the side cover.
12. The tank is now loose and can be lifted straight
up, but be careful of the air vent fitting towards the front of the machine. You
can maneuver that fitting around the nut and ball joint of the hood spring.
Just take your time.
13. Unplug the connection to the level sensor.
14. Lay the tank over to the side, or remove
the tank by removing the two 3/8” hoses from the tank making sure you note
where they came from. Then, take the 3/8” caps and cap off the both hoses so
there are no leaks.

15. Remove the ¼” vent valve hose and cap.
Next, we need to remove the cleaner tank.
16. Remove the two 3/8” socket head screws that mount the cleaner tank to the back wall.
17. Slowly lift the tank up and disconnect the level sensor connection.
18. Lay the tank over the side, or remove the tank by removing the two 3/8” tubes from the fittings and cap them off with 3/8” caps. Remember to drain the system and tank if you are removing the tank.
Before we remove the injector rail we will need to remove
the injector connections from the injectors themselves.
19. Use a small pocket screwdriver or a paint can
opener like in the tools picture, move the screwdriver between the injector and
the felt padding centering the screwdriver to the injector.
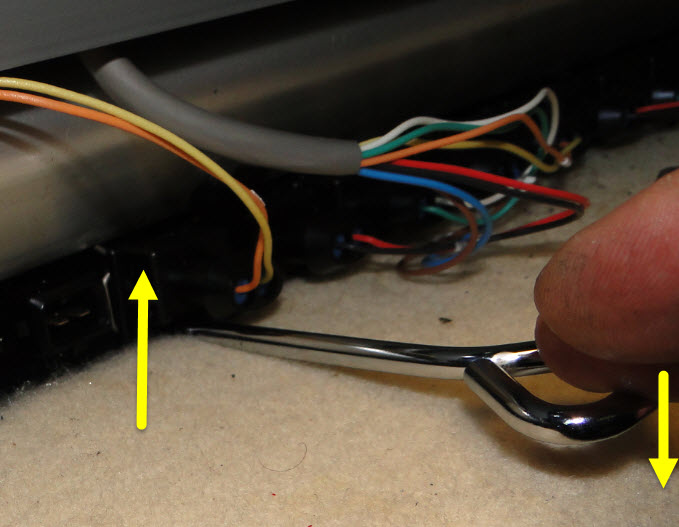
Then, push up on the screwdriver, this will push
up on the clip on the injector unlocking it. While the injector is unlocked,
grasp the connection and pull away from the body of the injector.
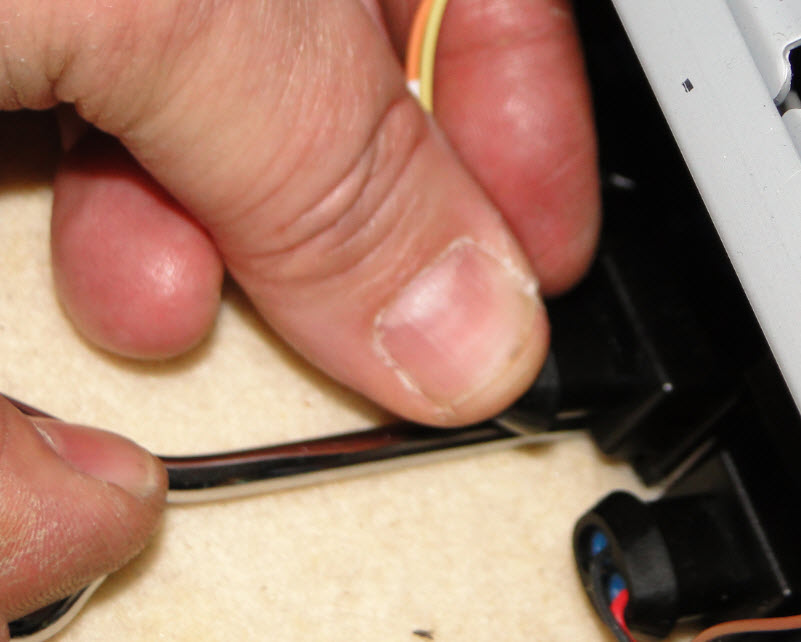 
20. You will need to do this to all 39 injectors.
21. After you finish unplugging all 39 connections,
disconnect the heater connection on the LH side of the injector rail under
where the conditioner tank was mounted.
To get at the rail mounting nuts under the accumulator rail,
you will need to remove the accumulator.
22.
Remove the two mounting nuts and lift and move the
accumulator away from the wall. Slide the two carriage bolts out and set aside
as they may fall out and get lost.
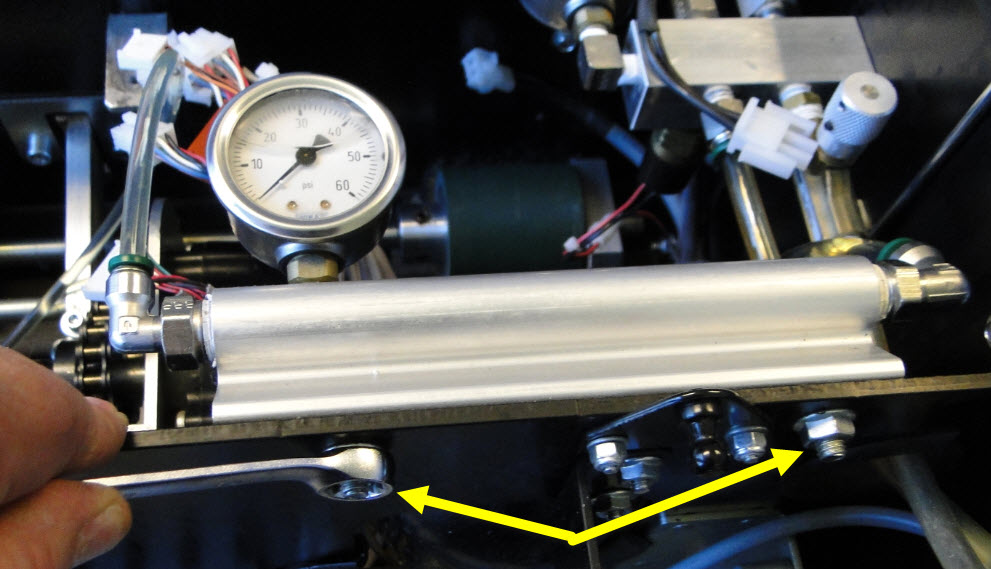 
23. You should now have clearance to remove the two nuts
for the injector rail.
24. Remove the two other nuts along the rail on the
inside so that the rail is loose. These are located below the buffer up/down
motor and below the AC power converter.
Removing the rail:
25.
Now that the rail is loose, you can disconnect
the 1/4” or 3/8” hose that leads up to the spin on oil filter from the end of
the injector rail on the left-hand side and remove the other 3/8” hose on
the right-hand side that leads up to the accumulator rail.
26. Drop the injector rail out the
bottom of the machine.
Once you have the old injector rail out you can now install
the new rail by following these instructions in reverse.
Replacing the heater element in the
injector rail:
By following the above replacement instructions, you will
have the injector rail out of the machine. Now, you can work on this injector
rail on the bench to replace the heating element.
27. Remove all the silicone
from each end of the rail that holds the element into the rail.
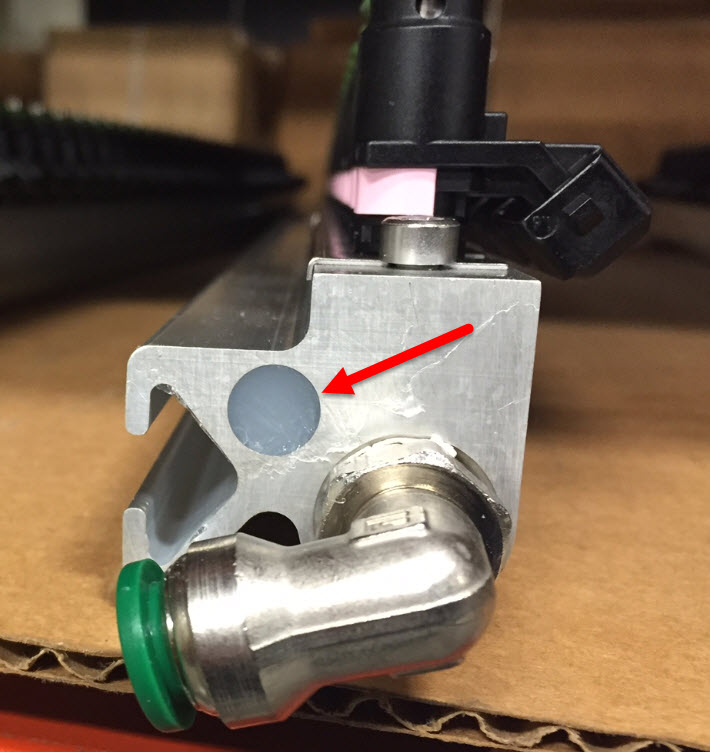 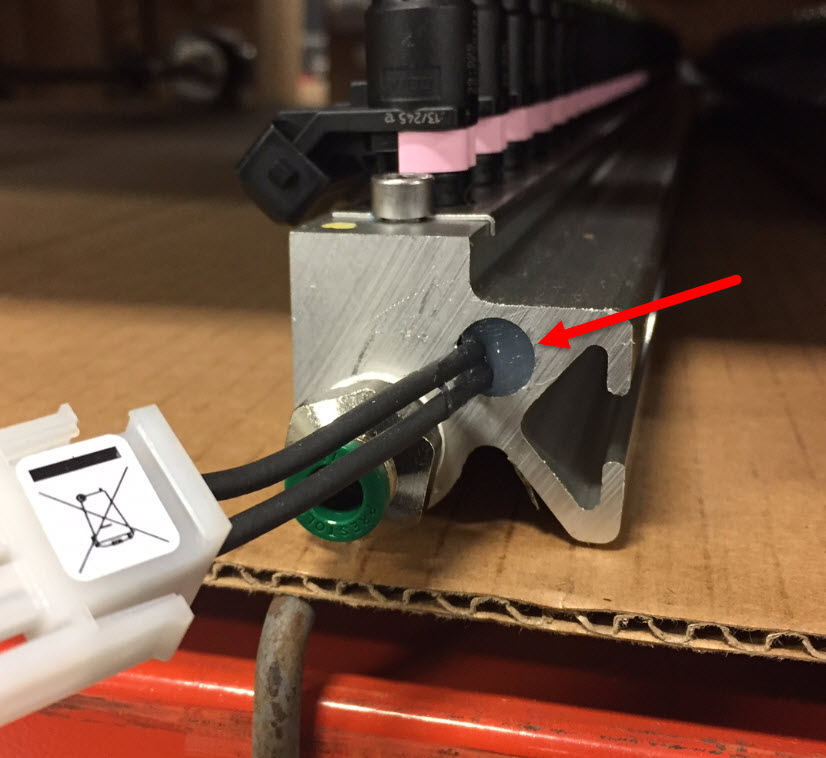
28. Pull out the heater
element from the rail. If it does not want to come out easily, you may have to
take a 1/4” threaded rod 20’ to 24” long to tap the element out of the injector
rail.
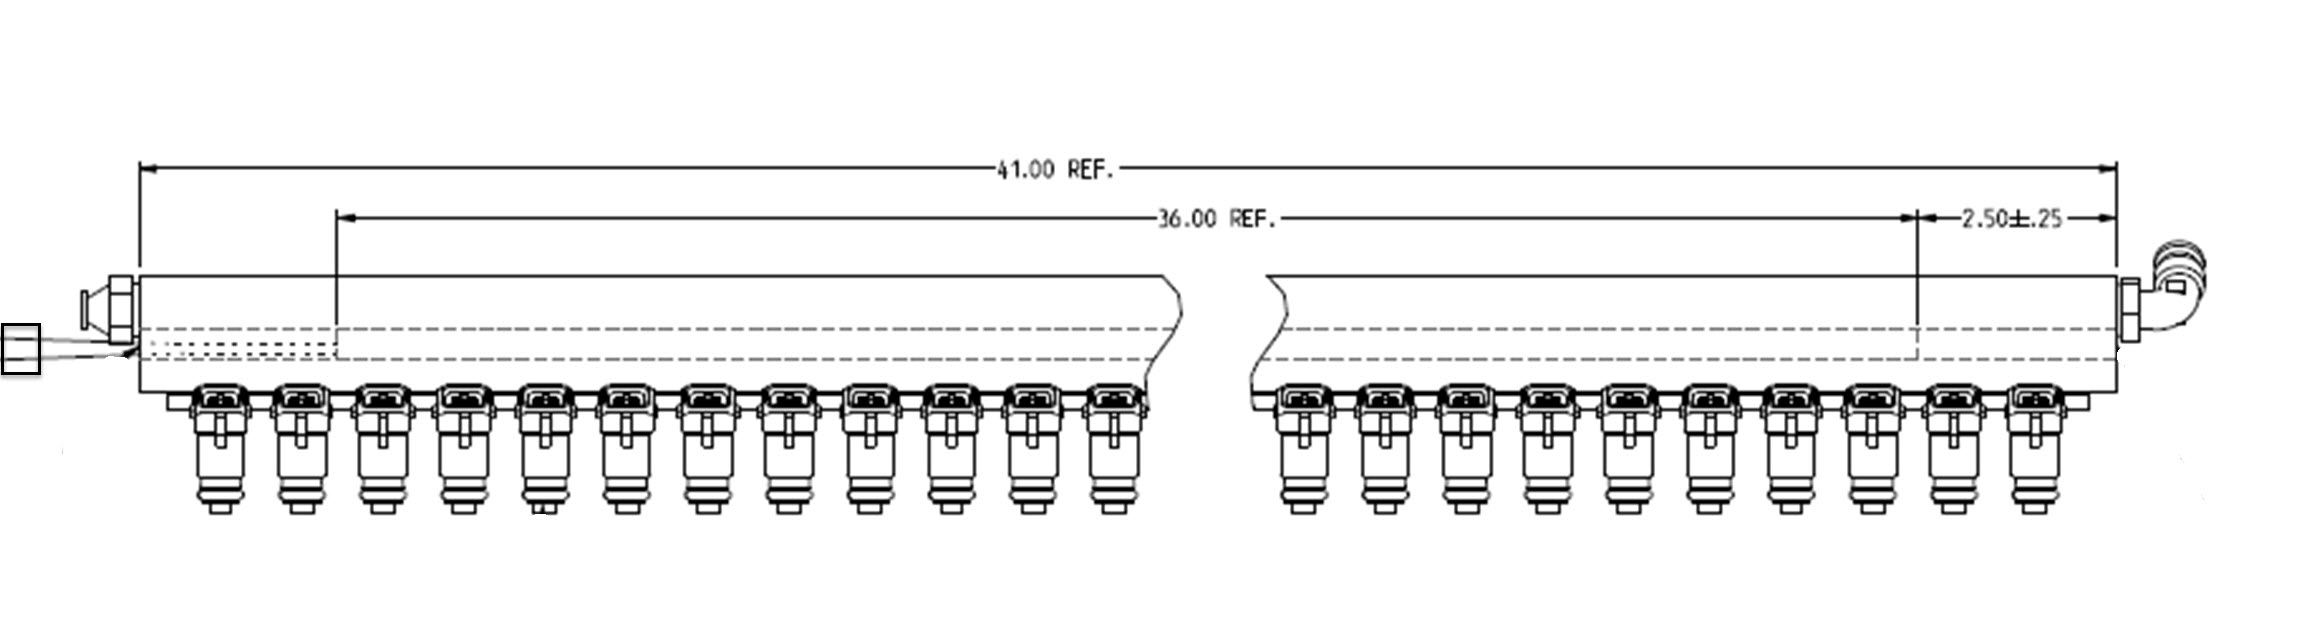
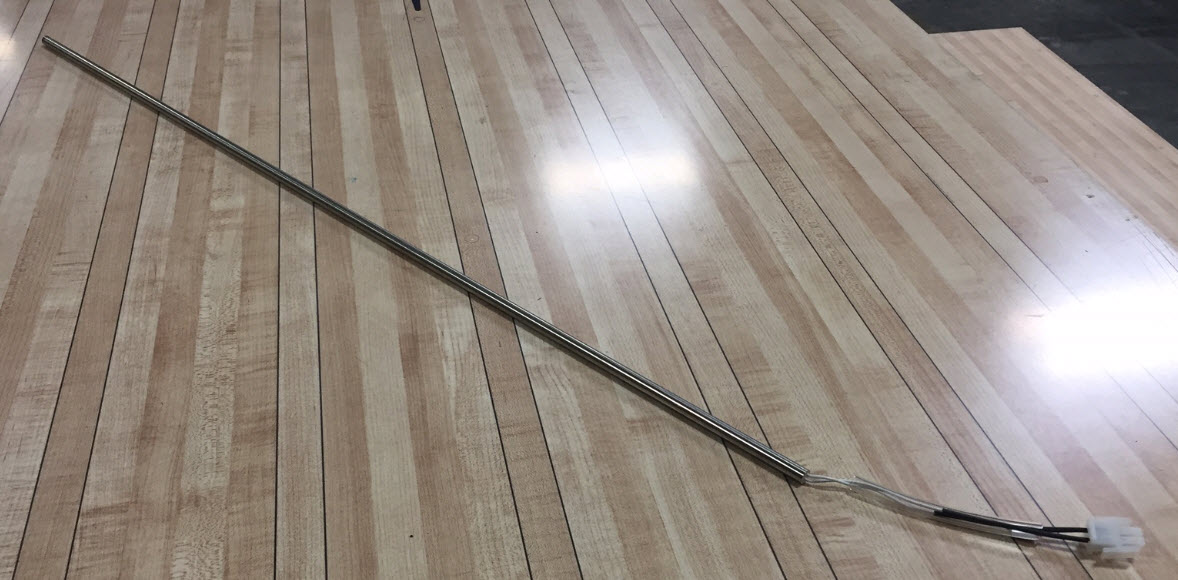
29. Once the heating element is out of the injector
rail, install the new element into the rail trying to center it inside the rail.
It should be placed 2-1/2” from each end. The rail is 41” long and the heating
element is 36” long. Center it the best you can and then fill the cavity
back up with silicone on both ends.
30. Reinstall the injector rail in reverse from the
instructions above.
|
