11/05/2020 - Customer will need to purchase custom interface from On The Mark Solutions. Have customer contact developer below for costs:
Mark Tutt
President, Chief Software Architect
On The Mark Solutions, LLC
1-920-475-7178 x101
marktutt@onthemarksolutions.net
www.onthemarksolutions.com
02/05/2023 - Added support contact for CenterEdge. 05/14/2021 - Updated highest Micros 3700 support level. 03/25/2021 - Added PosiTouch to list of approved vendors. 11/05/2020 - Added updated information on Micros Symphony support. 01/21/2020 - Added Givex POS to list of approved vendors.
10/03/2019 - Added Vista USA to list of approved vendors.
11/16/2018 - Updated information to synchronize with Brunswick 300 site.
02/27/2018 - Added Aloha information and Vendor Note Section.
02/22/2018 - Updated chart with PosiTouch information.
11/08/2017 - Updated chart with Ideal and Center Edge versions.
11/01/2017 - Revising chart for VP/Sync and updating version information.
05/02/2016 - Added note of compatible Micros versions.
07/21/2015 - Initial Release
1.1.2.2. Center Edge POS
1.1.2.3. Givex POS
1.1.2.3.1. Givex POS/Brunswick POS Integration
Environment:
Vector Plus or Sync CNS with External POS Interface and Givex POS
Applicable Version(s):
VP 2.8 or later, Sync 2.3 or Later
Document Description:
Guidance document on Givex POS interface with Brunswick CNS.
Applicable Files:
Givex External POS Interface with Brunswick.pdf
Related Information and Links:
N/A
Revision Date:
01/21/2020 - Added to KB.
1.1.2.4. Micros POS
1.1.2.4.1. OTM Interface - Micros 3700 POS
Environment:
Sync CNS or VP CNS with Micros External POS Interface
Applicable Version(s):
All versions of Sync, VP 2.8 and later
Micros 3700 POS - RES 5.7
Document Description:
The attached zip file contains the OTM application for the Micros server and configuration instructions.
Applicable Files:
OTMS Brunswick RES 5.7 Interface Setup.zip
Related Information and Links:
N/A
Revision Date:
05/06/2020 - Released to Knowledgebase.
1.1.2.5. Vista USA POS
1.1.2.5.1. Vista USA/Brunswick POS Integration
Environment:
Vector Plus or Sync CNS with External POS Interface and Center Edge POS
Applicable Version(s):
VP 2.8 or later, Sync 2.3 or Later
Document Description:
Guidance document on Vista POS interface with Brunswick CNS.
Applicable Files:
Brunswick Item Connector.pdf
Related Information and Links:
N/A
Revision Date:
12/10/2019 - Added to KB.
1.1.3. Inventory Notification Systems for Sync
1.1.3.1. Approved Inventory Notification Vendors
Environment:
Inventory Notification Interface for Sync
Applicable Version(s):
Latest Sync CNS Version
Document Description:
The following vendors are approved for the Inventory Notifications Interface:
Inventory Management System
Minimum Version
Certified
Vendor Notes
Contacts
YellowDog
Unknown
Yes
01/28/2022 - Initial service vendor, but has no certification on file.
1.1.4.1.1. Configure Sync Deposit Accounts with Meriq Reservations
Environment:
Sync CNS with Meriq Online Reservations
Applicable Version(s):
Sync 3.8
Procedure:
This procedure is assuming Meriq has already connected to the system and configured Sync to interface with the Meriq reservation system online.
Create Account Category
Open Sync Office
Navigate to Analysis > Account Categories
Click the + sign to create a new Category
Name the category Online Reservations or something similar
Click OK to save the new category
Click Exit
Configure Online Reservation Deposits
Open Sync Office
Navigate to Sales > POS Policies
Select the Reservations tab
Click the drop-down for Default Online Deposit Collection type and Change to the one you created
Click OK to save the change
At this point the system will automatically create deposit accounts for the Meriq reservations that are attached to the reservation.
The reservation deposits will be created with the reservation date and title from the reservation.
Creating Payment Method
The next step is to create a payment method to allow for tracking of the incoming and outgoing funds.
Open Sync Office
Navigate to Sales > Cash Payment Methods
Click the + sign to create a new payment method
Name the method Online Deposits or something similar
Check the Online Deposit Payment Method checkbox
Click OK to Save the new payment method
Click Exit
This will make sure all the sales reports properly account for the deposits coming into the system and being logged into the accounts.
Applicable Files:
N/A
Related Information and Links:
N/A
Revision Date:
12/06/2022 - Released to KB.
1.1.5. TightVNC Software
Environment:
Brunswick CNS Systems
Applicable Version(s):
Computers running Windows Server 2003 or later
Computers running Windows XP or later
Procedure:
The procedure below should be used for any Brunswick CNS computer that did not have TightVNC installed as part of the image.
Download the attached installer and copy the file to the tools folder for the CNS system.
Log into the computer under an administrator account (e.g. owner).
Navigate in Windows Explorer to the tools folder and double-click the installer file.
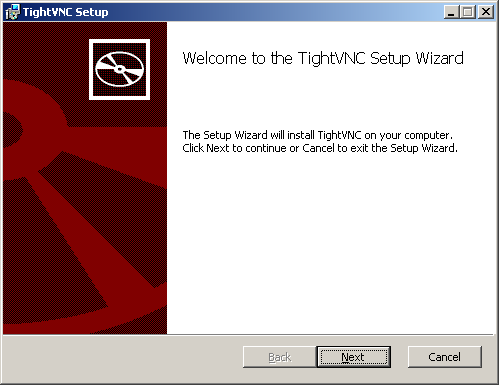
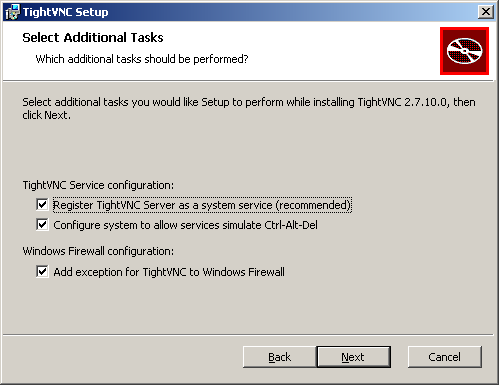
When the setup screen appears click Next.
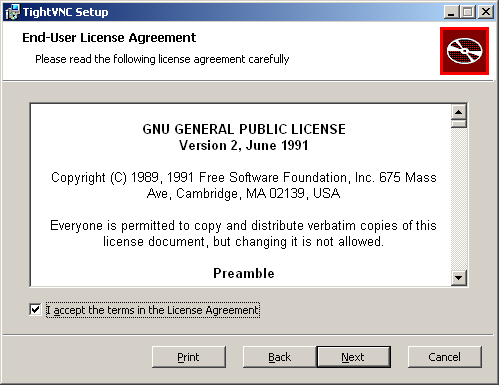
Check the box to accept the license agreement and click Next.
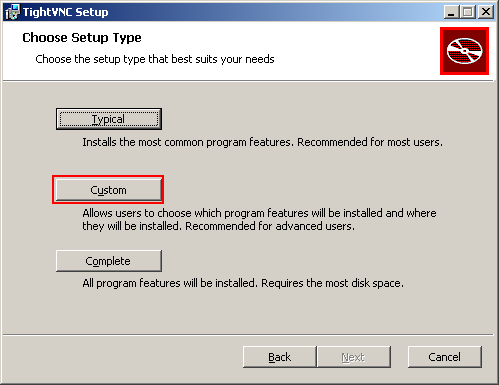
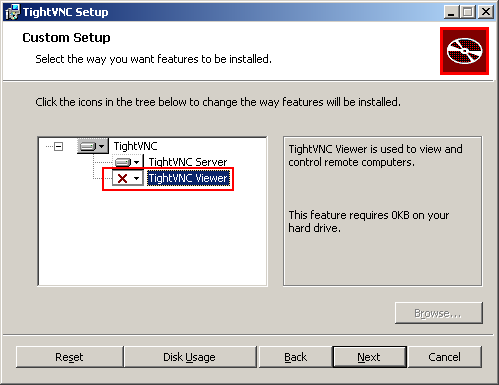
Select the Custom setup type.
Client PC's: Click the drop-down for TightVNC Viewer and select to not install, then click Next. Server PC's: Click the drop-down for TightVNC Server and select to not install, then click Next.
Verify that all three options are enabled on the Select Additional Tasks screen, and click Next. Note: The values on this screen will vary depending on whether installing the Server or Client portions.
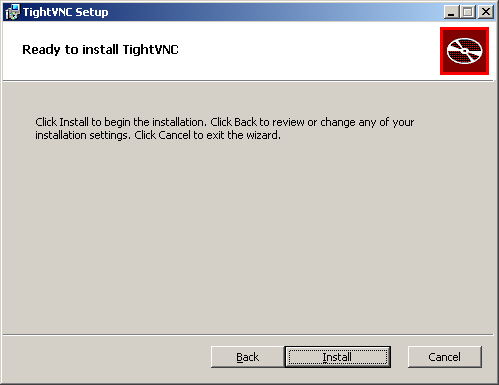
On the Ready to install screen click Install to being the installation.
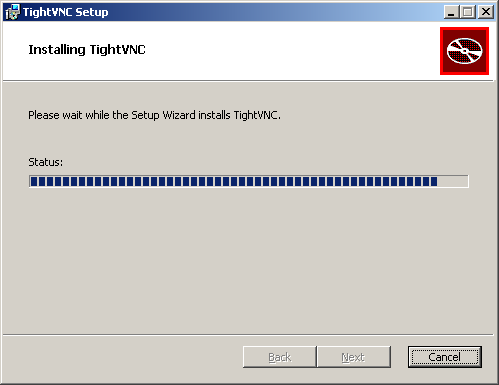
The software will begin to install, which should take 2-3 minutes.
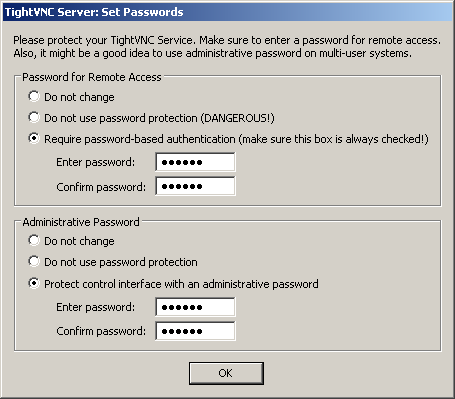
As the installation completes, you will be prompted with the Set Passwords screen.
Set the passwords to lower case:
"vector" for Vector/Vector Plus Systems
"sync" for Sync Systems
Click Finish on the final screen to close the installer.
You should now see the icon for TightVNC in the taskbar.
07/30/2020 - Updated to current 2.8.27 release from TightVNC. 10/15/2019 - Updated to current 2.8.23 release from TightVNC. 04/20/2017 - Added password information for Sync TightVNC setup. 09/16/2015 - Initial KB Release
1.2. Brunswick Cloud
1.2.1. Customers to access Sync Passport or OpenLane
Environment:
Brunswick Cloud
Section:
Members / Bowling Customer
Question:
How do my customers access their Sync Passport account? (Or, now with the OpenLane app option.)
Procedure/Guidance:
Either by going directly to SyncPassport.com or going to a custom SyncPassport URL for your specific center. You can place the custom URL on your web site and social media accounts. The URL to add to your website can be found in the Brunswick Cloud > Account > Membership > Membership link. This link is a double opt-in process for customers.
Customers can also use the same credentials and log into the OpenLane app.
In addition to the information above, we have a number of training videos and resources available in Brunswick Cloud located in the Support section.
If you have further questions on the Brunswick Cloud, we offer specialized Managed Marketing Services to assist with best practices and advanced training. You can purchase these services www.brunswickcloud.com under Purchase Features.
Related Information and Links:
Revision Date:
1.27.2021
1.2.2. Adding Members to the Cloud
Environment:
Brunswick Cloud
Section:
Members
Question:
Can I manually import or add members to the Cloud?
Procedure/Guidance:
There’s not a capability to import member lists to the Brunswick Cloud at this time.
Recommendations:
• Include the sign up link in emails and on your website. This can be found for the account under account > membership and it’s a green hyperlink. Or if you want to have a different link by center it’s located under centers > connections and it’s the green hyperlink. This is a double opt-in process.
• Encourage guests to download and create a profile with the OpenLane app. This will opt them in as well.
• For online reservations, make sure your settings with Meriq include all online reservations to be opted-in.
In addition to the information above, we have a number of training videos and resources available in Brunswick Cloud located in the Support section.
If you have further questions on the Brunswick Cloud, we offer specialized Managed Marketing Services to assist with best practices and advanced training. You can purchase these services www.brunswickcloud.com under Purchase Features.
Related Information and Links:
Revision Date:
1.27.2021
1.2.3. Brunswick Cloud - Campaigns vs Channels
Environment:
Brunswick Cloud
Section:
Campaigns
Question:
What is the difference between a Campaign and a Channel?
Procedure/Guidance:
A campaign contains individual channels (ex. Overhead Commercials, Email Scoresheets). The campaign acts as control for those channels; if the campaign is active, the active channels below are also active. The campaign’s active dates are therefore the active dates for channels (unless otherwise configured at the channel level).
Channels are the individual displays or emails that will be used as part of your marketing plan.
Types of Channels Within a campaign, you have the following available channels:
Transactional Emails – Customizable emails that can include your center’s information, advertisements, events, and special offers. (assumes bowler has entered an email during their visit)
Email Receipt - Emailed to a bowler after their transaction is completed.
Email Scoresheet – Emailed after bowler has completed their session on the lane (timed or all games).
Email Reservation – Emailed after a bowler has made a reservation through Sync Reservations.
Point of Sale – Customizable printouts that can include your center’s information, advertisements, events, and special offers.
Printed Receipt – Printed for a bowler after their transaction is completed.
Printed Scoresheet – Printed for a bowler that has completed their session on the lane (timed or all games).
Printed Reservation – Printed for a bowler that has made a reservation through Sync Reservations.
In-Game – Advertise while bowlers are playing on the lanes, allowing them to see your specials, upcoming events, register their email, and even call for service.
Game Ads (Overhead) – Advertisements will display below the scoresheet during play.
Game Ads (Console) SYNC TABLET ONLY - Advertisements will display below the scoresheet or menu icons during play.
Specials (Overhead) KEYPAD ONLY– Advertisements will display when a bowler selects Specials on the overhead.
Specials (Console) SYNC TABLET ONLY- Advertisements will display when a bowler selects Specials on the console. Bowler can touch advertisement to order service at the lane or enter an email address for your newsletter.
Advertising and Marketing - Advertise your specials, upcoming events, leagues, and anything else to your bowlers in your center and those outside your center!
Commercial (Overhead) - Advertisements will display on the screen while the lane is not in use.
Marketing Email – Using a set of dynamic email templates, craft your messaging that will drive bowlers back in to your center.
Digital Signage - Advertisements and videos will display on the screen.
Social Media – Leverage the power of your social network to schedule tweets or Facebook posts promoting your center, specials, events, and anything else that will drive business.
Facebook – Messaging that will post to your Facebook wall. All followers of your wall will see your post.
Twitter - Messaging that will post to your Twitter feed. All of your Twitter followers will see your post.
In addition to the information above, we have a number of training videos and resources available in Brunswick Cloud located in the Support section.
If you have further questions on the Brunswick Cloud, we offer specialized Managed Marketing Services to assist with best practices and advanced training. You can purchase these services www.brunswickcloud.com under Purchase Features.
Related Information and Links:
N/A
Revision Date:
06/25/2020 - Added to Brunswick Knowledgebase.
1.2.4. Can I have a channel display on specific lanes?
Environment:
Brunswick Cloud
Section:
Campaigns
Question:
Can I have a channel display on specific lanes?
Procedure/Guidance:
Yes. Use the Filters slide out for In-Game or Commercial Overhead channels
In addition to the information above, we have a number of training videos and resources available in Brunswick Cloud located in the Support section.
If you have further questions on the Brunswick Cloud, we offer specialized Managed Marketing Services to assist with best practices and advanced training. You can purchase these services www.brunswickcloud.com under Purchase Features.
Related Information and Links:
Revision Date:
1.27.2021
1.2.5. Collected Emails as Members Defined
Environment:
Brunswick Cloud
Section:
Members
Question:
What is an "email collected"? What is a "member" or "opt-in"?
Procedure/Guidance:
Email Collect: A bowler that has entered their email somewhere in the Sync system (either at the tablet or in Sync Desk)
Member or Opt-In: A bowler that has entered their email somewhere in the Sync system, and given you permission (opted-in through email or settings) to receive future communications from you.
Members can opt-in a the lanes by checking a box (3.7 or higher), creating an account with Sync Passport, clicking a coupon on a scoresheet email, opting in via the OpenLane app, or by checking the box to opt-in when making online reservations via Meriq.
In addition to the information above, we have a number of training videos and resources available in Brunswick Cloud located in the Support section.
If you have further questions on the Brunswick Cloud, we offer specialized Managed Marketing Services to assist with best practices and advanced training. You can purchase these services www.brunswickcloud.com under Purchase Features.
Related Information and Links:
Revision Date:
1.27.2021
1.2.6. What do I need to use coupons in my center?
• Active Offer • Email Query (or send it to everyone)
• Email
• Scoresheet – send it to everyone that bowls
• Receipt – send it to everyone that asks for an emailed receipt
• Marketing Email – send it to only the people you want to
• 2D barcode scanner (can be purchased from Brunswick Sales)
In addition to the information above, we have a number of training videos and resources available in Brunswick Cloud located in the Support section.
If you have further questions on the Brunswick Cloud, we offer specialized Managed Marketing Services to assist with best practices and advanced training. You can purchase these services www.brunswickcloud.com under Purchase Features.
Procedure/Guidance: A number of issues you should check:
1. Was the email channel Active? Check to see if it is paused under the Campaign or while editing the Channel, under Settings
2. Was the Campaign Active? If the Campaign is paused, all email channels are paused as well.
3. If you used an Email Coupon template, but did not edit the “call to action” button with an offer, or used an inactive offer, the email will not send. Use a different template or use a different offer.
4. If you used a query, it could be that there were no email addresses that matched the criteria of the query when the email went out. Example: New Members Yesterday. If no one opted- in yesterday, it would have not sent to anyone.
In addition to the information above, we have a number of training videos and resources available in Brunswick Cloud located in the Support section.
If you have further questions on the Brunswick Cloud, we offer specialized Managed Marketing Services to assist with best practices and advanced training. You can purchase these services www.brunswickcloud.com under Purchase Features.
Related Information and Links:
{Links to other Articles}
Revision Date:
{Update Date}
1.2.8. Branded email scoresheets for your bowlers
Environment:
Brunswick Cloud
Section:
Campaigns / Members
Question:
When does a bowler get their scoresheet emailed to them?
Procedure/Guidance:
Procedure/Guidance:
1. Verify that you have a Campaign with an Email Scoresheet channel active. Verify in Brunswick Cloud and in Sync Office.
2. If a bowler has entered their email address (either in Sync Desk or at the lane), the bowler will receive an email with a link to their scoresheet after they finish bowling.
3. After the bowler completes their session (time or games) on the lane, the scoresheet will be emailed to them within 10 minutes.
In addition to the information above, we have a number of training videos and resources available in Brunswick Cloud located in the Support section.
If you have further questions on the Brunswick Cloud, we offer specialized Managed Marketing Services to assist with best practices and advanced training. You can purchase these services www.brunswickcloud.com under Purchase Features.
Related Information and Links:
{Links to other Articles}
Revision Date:
{Update Date}
1.2.9. Multiple Products on one Offer/Coupon
Environment:
Brunswick Cloud
Applicable Version(s):
All
Document Description:
Document explains the new process for connecting multiple products to an Offer/Coupon in the Brunswick Cloud.
Applicable Files:
Brunswick Cloud Offers - Multiple products.pdf
Related Information and Links:
N/A
Revision Date:
08/30/2018 - Released to KB.
1.2.10. Multiple Channels that Overlap
Environment:
Brunswick Cloud
Section:
Campaigns
Question:
Can I have multiple channels that overlap?
Procedure/Guidance:
Procedure/Guidance: Yes.
If multiple channels overlap (date and time), they will cycle through in order displayed in Sync Office.
• Use Case 1: A center has multiple Commercial channels play through the day, and those Commercials will cycle through in order, one after the other.
• Use Case 2: A center can have multiple Email Scoresheet emails with different messaging on it, allowing a center to test different types of messaging.
• Use Case 3: A center may have multiple specials: 1) Free pitcher with a purchase of a 16” pizza 2) Enter our email to receive our newsletter and 3) Get 10% off tickets tonight. All three of these specials would drive revenue opportunities, but with different actions.
In addition to the information above, we have a number of training videos and resources available in Brunswick Cloud located in the Support section.
If you have further questions on the Brunswick Cloud, we offer specialized Managed Marketing Services to assist with best practices and advanced training. You can purchase these services www.brunswickcloud.com under Purchase Features.
Related Information and Links:
Revision Date:
1.27.2021
1.2.11. Can I have a channel run at a certain time of day?
Environment:
Brunswick Cloud
Section:
Campaigns
Question:
Can I have a channel run at certain time of the day?
Procedure/Guidance:
Procedure/Guidance: Yes.
As an example, you may wish to have specific In Game Ads during different times of the day. Simply configure the individual ads for a specific time.
1. Open/Edit the specific ad that requires time constraints. 2. Select the Schedule icon, selecting the Scheduled radio button. 3. Select the time/day/date for the ad and click “Save Changes”.
In addition to the information above, we have a number of training videos and resources available in Brunswick Cloud located in the Support section.
If you have further questions on the Brunswick Cloud, we offer specialized Managed Marketing Services to assist with best practices and advanced training. You can purchase these services www.brunswickcloud.com under Purchase Features.
Related Information and Links:
Revision Date:
1.27.2021
1.2.12. Scoresheet Emails - Troubleshooting
Environment:
Sync CNS with Brunswick Cloud
Applicable Version(s):
Sync 2.1 and later
Document Description:
The attached document provides detailed troubleshooting instructions for customers and support staff of possible causes of scoresheets not being emailed to bowlers.
Applicable Files:
How To - Troubleshooting Emailing Scoresheets.pdf
Related Information and Links:
N/A
Revision Date:
08/20/2018 - Released to KB.
1.2.13. Uploading Commercial Overheads
Environment:
Brunswick Cloud
Section:
Campaigns
Question:
Can I upload existing commercials to Sync CRM?
Procedure/Guidance:
Sync CRM allows you to import images. As long as the existing commercials are images they can be uploaded and used with an image template. Below is a PDF to download with image sizes if you want to make it to spec of specific channels.
In addition to the information above, we have a number of training videos and resources available in Brunswick Cloud located in the Support section.
If you have further questions on the Brunswick Cloud, we offer specialized Managed Marketing Services to assist with best practices and advanced training. You can purchase these services www.brunswickcloud.com under Purchase Features.
Review the Support section for tutorial videos. Start with the intro video here - LINK
In addition to the information above, we have a number of training videos and resources available in Brunswick Cloud located in the Support section.
If you have further questions on the Brunswick Cloud, we offer specialized Managed Marketing Services to assist with best practices and advanced training. You can purchase these services www.brunswickcloud.com under Purchase Features.
09/11/2023 - Updated with new URL's. 12/19/2022 - Added additional URL to whitelist. 02/20/2020 - Updated with current list or URL's. 03/09/2016 - Released to Knowledgebase.
1.2.15.1. Use HTTPS for all Cloud Check In Site Addresses
Environment:
Cloud Check In section of Sync Office
Applicable Version(s):
All
Issue:
Using only http at the beginning of the address will not work and cause various symptoms to the system.
Cause:
The Check In Path only allows secure connections with https
Solution:
Make sure the cloud site Check In Path address on the Check In page starts with https and not http.
Applicable Files:
Related Information and Links:
Revision Date:
10/12/2020 - Released to KB
1.3. Brunswick Interactive Games
1.3.1. BIG Scoring Multiplies Each Score Interfaced with Vector by 2x, 3x, 4x, etc.
Environment:
BIG (Brunswick Interactive Games) scoring
Applicable Version(s):
All
Issue:
The score sent from Vector scoring to BIG will double, triple, or quadruple such as a strike in Vector will display 20, 30, 40, etc. on the BIG side.
Cause:
The BIG network interface card is not isolated on its own network segment.
Example: The NIC used for BIG is also being used for an external POS system (EPOS) interface.
Solution:
Ensure that the BIG network interface card is isolated to its own network segment and is not interfacing with any other system.
Applicable Files:
Related Information and Links:
Revision Date:
03/30/2020 - Released to KB
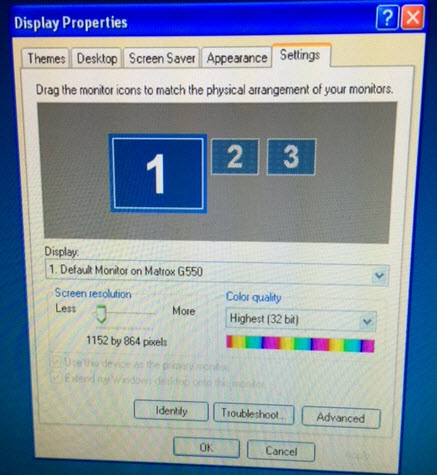
1.3.2. Championship Racing Game Hangs when Opening BIG
Posted ValuesPosted ValuesPosted Va
Environment:
BIG application of the BIG server
Applicable Version(s):
All
Issue:
All Games work except the Championship Racing game
Cause:
Resolution is not correct
Solution:
Change the resolution settings on the BIG server to 1152 x 864 pixels for the Matrox card display.
Applicable Files:
Related Information and Links:
Revision Date:
1.3.3. Release Notes
1.3.3.1. BIG 3.0.0.21 Release Notes
Environment:
All
Applicable Version(s):
3.0.0.21
Document Description:
Release Notes for BIG 3.0.0.21.
Applicable Files:
BIG Release Notes 3.0.0.21.pdf
Related Information and Links:
1.4. Brunswick Leagacy CNS Reboot Procedure
Environment:
Vector Plus and Vector Desk CNS
Applicable Version(s):
All
Document Description:
This document provides the recommended sequence for rebooting the Brunswick Legacy CNS systems.
Applicable Files:
Brunswick Legacy CNS System Reboot Procedure.pdf
Related Information and Links:
N/A
Revision Date:
11/03/2021 - Updated document to revision 6 to include new Virtual legacy platforms. 02/04/2020 - Updated document to include reference to the T340 Server. 11/08/2017 - Revision 5 of document released to address T330 VM process for Vector Plus
1.5.4. Random or All Projectors do not Project Spark Images to the Lane and Only Shows a Solid Color
Environment:
Spark Active HDMI cables
Applicable Version(s):
All
Issue:
Spark games or attraction mode is not projecting animations to the lanes. The projector will show a solid color such as the default projector background color of blue, or nothing at all to the lane.
The Spark system will be configured correctly with all projectors actively taking signals from the desk and function to turn projectors on/off and Eco Mode on/off.
Ring lights can be controlled.
Tight VNC will show the animations on the desktop of the Spark server as it should.
Nvidia settings and resolution for the projectors will be correct.
Cause:
In this case it is possible that the active HDMI cable is plugged into the wrong location at each connection.
The active HDMI cable connections have specific connection for input (source) and output (destination). The connections may or may not be labeled, but in most cases is labeled.
Solution:
Since the HDMI cables are active, they must be plugged into the correct device to work properly. The input (source) connection should be connected to the Spark server and the output (destination) connection should be connected to the Node for the projector to work properly.
You may have to reverse the way the cable is connected to the devices.
Although it requires a little more time during the installation, if a center is going to install the HDMI cables through hard to access areas, it is suggested to test the HDMI cables projector connections on top of the lanes before permanent install. The time spent may be worth it compared to pulling the cables back out upon finding out the connections need to be reversed.
09/20/2022 - Updated manual released. 09/16/2022 - Released to KB.
1.5.6. Spark system reinitialization after license lapse or expiration
Environment:
Sync location with Spark
Applicable Version(s):
All
Procedure:
The Brunswick Spark system is driven by a Cloud-feature control. This allows the system to maintain normal operations and receive updates. If this feature is not kept up to date the system will no longer function.
The following conditions will trigger deactivation of the Spark system:
The Spark License subscription renewal has lapsed.
The Sync system has not checked in with the Brunswick Cloud in more than 30 days.
At this point the following procedure will need to be completed in order to regain control of Spark:
Centers should verify their Spark subscription is active in the Brunswick Cloud.
From the Cloud Dashboard, select Centers and then Features to verify.
If the Feature is not active, contact your sales rep or distributor for guidance.
Once the subscription is verified, you will need to perform a check-in within Sync Office.
Open Sync Office
Navigate to Admin > Check In
Click the Log In button and OK the confirmation.
Click the Check In button and OK the confirmation.
Verify that Spark Bowling is on the list of Features Installed to the right.
Once the feature is active, a system-wide reboot is required.
In Sync Office, navigate to Admin > System Health
Click Restart Services and click OK.
Click Cancel on the System Health screen.
Close Sync Office.
Open Sync Desk and log in.
Select all of the lanes that contain Spark.
Navigate to More > Device Control.
Verify Display Controller is selected and click Reboot, followed by OK.
You will need to wait for the display controllers to complete their reboot.
Select all of the lanes that contain Spark as done above.
Navigate to More > Device Control.
Verify Spark is selected and click Reboot, followed by OK.
Once the Spark servers have completed their reboot, the system will be operational and ready for use.
If this procedure does not restore operations, please contact your local distributor of Brunswick Technical Support.
Applicable Files:
N/A
Related Information and Links:
N/A
Revision Date:
04/28/2023 - Released to KB.
1.5.7. Turn Off Spark Light Rings for League
Environment:
Sync Desk
Applicable Version(s):
Sync 3.5.90 and higher with Spark
Procedure:
See attachment
Applicable Files:
'Turn Off Spark Light Rings for League.pdf'
Related Information and Links:
Revision Date:
03/05/2020 - Released to KB
1.6. Brunswick Sync
1.6.1. Customer Relationship Management (CRM)
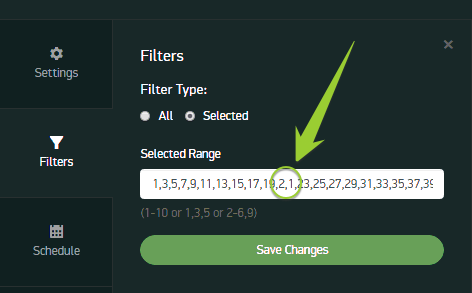
1.6.1.1. Comma Usage in the Filtering of CRM Channels
Overhead ads are staggered so that the odd lanes have a different ad than the even lanes. The Filters section of the CRM is used to filter a single ad/channel for the odd lanes. However, Lanes 1 & 2 show the same ads, as well as 21 & 22.
Cause:
The comma separation in the Selected Range is incorrectly set for lane 21 in that the comma is between the 1 and 2. This causes issues with both lanes 1/2 and lanes 21/22. See image below:
Solution:
Ensure proper comma separation between the desired lane numbers.
Applicable Files:
Related Information and Links:
Revision Date:
05/09/2017 - Released to KB
1.6.1.2. Enabling Social Media Channels for Sync CRM
Environment:
Brunswick Sync Cloud
Applicable Version(s):
All
Procedure:
See attachment
Applicable Files:
'Enabling Social Media.pdf'
Related Information and Links:
Revision Date:
08/16/2018 - Released to KB
1.6.1.3. Importing Email Lists not Supported
Environment:
CRM email input
Applicable Version(s):
All
Issue:
Unable to import email lists
Cause:
Brunswick Sync CRM does not allow a blanket import of email lists due to unable to verify that the customer has truly opted-in.
Workaround Option:
You can send them the link to opt-in to Sync CRM via the specific web link in the system. You can find it by going to:
Centers > Connections > Membership Link from Center Web Page.
Either put that Membership Link in a link short cut or paste it as is, and you can get those emails to that link to opt-in.
Applicable Files:
Related Information and Links:
Revision Date:
08/16/2016 - Released to KB
1.6.1.4. In-Game Ad Support
Environment:
Sync Scoring with In-Game Ads
Applicable Version(s):
Sync 2.3.590
Issue:
In-Game Ads not functional on all themes and games
Cause:
This is by design. Due to the nature of real estate usage by some games and themes not all can display the ads.
Guidance:
The following list contains the themes/games that support In-Game Ads currently:
Best Frame My Game My League My Shot PinPix Stats King The Buzz The League The Rivalry Tournament (Singles, Doubles, Triples, Team) Zoom
Applicable Files:
Related Information and Links:
Revision Date:
06/27/2018 - Released to KB.
1.6.1.5. How to Shuffle the Sequence of Commercials
Environment:
Campaigns and Channels of CRM
Applicable Version(s):
All
Procedure:
Create a new campaign with existing channels in the order you want them.
As an example, create an empty campaign. Take note of the overheads as you want them.
Add a new Commercial Overhead instead of the empty layouts, and select the My Channels tab.
You can then add a specific channel to a campaign. So, I would create a campaign that had the following:
1. Bring your A game - ABB
2. New Breakfast Hours
3. Kids Bowl Free
4. SIN League
and so forth.
Then, go and pause all the duplicate channels in the other campaigns.
Applicable Files:
Related Information and Links:
Revision Date:
08/17/2016 - Released to KB
1.6.1.6. Syncpassport.com is not Updating League Scores for a Bowler
Environment:
SyncPassport settings and configuration
Applicable Version(s):
All
Issue:
The bowler receives the CRM email every week, but the current league scores are not updating properly after bowling.
Cause:
Email information and settings does not match between receiving score sheets, log in for syncpassport and BLS 2017 application.
Solution:
Confirm the following:
The email address where the league bowler receives his score sheets.
The email address that the league bowler uses to log in to syncpassport.com.
The email that is entered in BLS 2017 for this league bowler.
Applicable Files:
Related Information and Links:
Revision Date:
8/17/2017
1.6.2. Sync How-To Guides
1.6.2.1. Issuing Wait List/Reservation Party with ePOS Interface
Environment:
Brunswick Sync with ePOS Interface Enabled
Applicable Version(s):
Sync 2.3.592 and later
Procedure:
This procedure assumes that the Wait List or Reservation party has already been created.
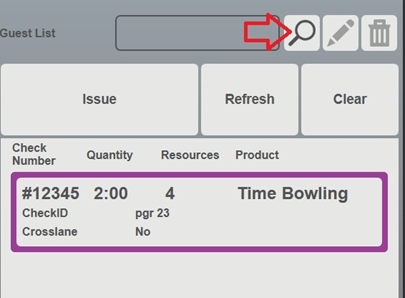
Select the Check from the Desk window that is to be issued with the party.
Select the Magnifying Glass to access the Find Guest List window.
Choose either the Wait List or Reservations tab as needed.
Select the party to attach to the check and click OK.
On the main screen the part name will now be listed.
Select Issue to complete the process of sending the party to the lanes.
Applicable Files:
N/A
Related Information and Links:
N/A
Revision Date:
12/04/2018 - Released to KB.
1.6.2.2. Procedure for Operating Keypad Intercom for SYNC Scorer
Environment:
Computer answering intercom calls
Applicable Version(s):
Procedure:
This document describes how to answer intercom calls coming from the lanes.
Applicable Files:
'Procedure for Operating Keypad Intercom for SYNC Scorer.pdf'
Sync CNS with Meriq Online Reservations with Automatic Deposit
Applicable Version(s):
Sync Invicta 3.4 and later
Procedure:
There are two stages to refunding deposits for Meriq reservations:
Meriq Deposit
The Meriq payments are handled through your payment processing company. Neither Meriq or Brunswick can initiate a direct refund for the deposit. You will need to reach out to Meriq at info@meriq.com for assistance in obtaining a list of reservations you would like to refund, and then contact your processor for assistance in refunding the deposits.
Clearing Deposit from Sync
Login to Sync Office.
Click the Analysis tab, click Accounts and then search for the account.
Once you have found the account, double click it.
Click the Details tab and then Adjust in the bottom right corner of the window.
In the adjustment field, type in the amount of the refund with a minus sign in front(-123.45).
Type the reason for the adjustment in the notes field and then click OK to exit the adjustment screen.
Confirm the balance is at $0 now, then click OK to close the account window.
The account and reservation can now be removed from the system.
Applicable Files:
N/A
Related Information and Links:
N/A
Revision Date:
04/30/2020 - Released to Knowledgebase.
1.6.2.4. Rotations Recovery within Sync
Environment:
Sync Desk
Applicable Version(s):
All
Issue:
Lanes shut down early as if the squad is done and the proper rotation did not take place.
Cause:
Issue is still being researched by Brunswick.
Solution:
See attachment
Applicable Files:
Rotations Recovery within Sync.pdf
Related Information and Links:
N/A
Revision Date:
02/14/2019 - Released to KB
1.6.2.5. Updating Social Feed files after Sync Update
Environment:
Sync CNS
Applicable Version(s):
Sync 2.3 and later
Procedure:
When Sync updates are installed, the existing Social Feed and Text Effects files are replaced with new copies from the installer.
As noted in the Sync Release Notes, the center should always back up these files prior to updating so they can be restored if the center has altered the content. A backup can be as simple as copying the files from the folder to the desktop, or they can be copied to a USB drive for safe keeping.
The files are located in the following location on the Sync server: C:\Program Files X86\Brunswick\Sync\Sync Install\Content\Scoring Materials\
Once you have installed the Sync update, the following steps are needed to restore the altered files. Note that Brunswick advises this is done in the morning before bowling activity has begun.
Part 1: Restoring the backup files
Open Windows Explorer.
Navigate to C:\Program Files X86\Brunswick\Sync\Sync Install\Content\Scoring Materials\
Open a second instance of Windows Explorer.
Navigate to the location of the altered Social Feed and/or Text Effects files.
Highlight both files and press and hold the CTRL key and then press the C key to copy the file(s) into memory.
Close the second Windows Explorer window, and then click inside the original window.
Press and hold the CTRL key and then press the V key to paste the files here.
Confirm overwriting the existing files when prompted.
Close the Explorer window.
Part 2: Updating the Scorers
Open Sync Office.
Select the Media tab.
Select Update Scorers.
Select Redetect Changes. This will force the system to rebuild the content manifest, which is what controls the content that is updated to the scorers.
This process will take between 7-20 minutes depending on the speed of the server and the amount of content on the system.
Select the Lane pairs below to determine the display controllers to update.
Select Synchronize to update the content on the display controllers.
Once completed the altered files will be on the scorers and ready for use.
Applicable Files:
N/A
Related Information and Links:
N/A
Revision Date:
06/04/2019 - Released to KB.
1.6.2.6. Using OrderNow and requiring Validated Tabs
Environment:
Sync POS with Lane Tablets and US Payment Card Integration
Applicable Version(s):
Sync Prima and Later
Procedure:
At this point Brunswick does not have a direct way to link a payment to an OrderNow transaction.
The Brunswick Training Department advises the process below as a way to accommodate this.
Prep Work
Create a $0 product that can be used to open a transaction for the lane. Most centers call this product “Order Now” for ease of recollection.
Assign to the product to the appropriate Groups for usage.
Operation
Create the transaction that will be used to track the validated card using the new “Order Now” product.
Set the name of the tab to the Lane Number for ease of recall when needed later.
Process the Validated card against the transaction and select Pay Later.
The customer will use OrderNow at the lane, which will create a second transaction.
Using the Authorization Code option will allow you to limit the usage to only those the have validated a card.
Closing Transaction
When the bowlers have finished their visit the counter staff will need to combine their OrderNow tab with the original tab that contains the validated card.
Once the tabs are combined, the staff will have the option to either pay with the validated card or have the customer use their card again for payment.
Comprehensive troubleshooting guide for end users.
Applicable Files:
Kiosk Scoring Troubleshooting - Customer.pdf
Related Information and Links:
N/A
Revision Date:
05/09/2022 - Released to KB.
1.6.3.2. Sync Kiosk User Manual
Environment:
Sync Kiosk system
Applicable Version(s):
Sync 2.2/2.3
Document Description:
This user manual describes how to bowl and navigate the screens necessary for the Sync Kiosk system.
Applicable Files:
Kiosk User Manual.pdf
Related Information and Links:
N/A
Revision Date:
05/16/2018 - Updated for Sync 2.2/2.3. Includes MyShot information. 01/19/2017 - Released to KB.
1.6.4. Sync Options
1.6.4.1. EPOS Interface
1.6.4.1.1. Sync Network Topology w/EPOS(External Point of Sale)
Environment:
Sync system w/EPOS
Applicable Version(s):
All
Document Description:
This document shows the standard network topology for a Sync CNS with External Point of Sale interface.
Applicable Files:
See attachment
Related Information and Links:
Revision Date:
02/26/2019 - Released to KB
1.6.4.2. Sync Stored Value Interface
1.6.4.2.1. Stored Value - Reporting Information
Sync reports value added to stored value (SV) cards and value removed from SV cards via payments in the "Stored Value" section of the sales report. This section only includes direct addition/removal of monetary value to SV cards by Sync. It does not include SV package sales.
From the perspective of Sync, this operation directly adds or removes monetary value to/from a card. Therefore, these operations are not taxed because the SV card is functioning like a gift card, and sales of gift cards are not generally taxable nor do they count as revenue. If, however, adding a specified amount of money to a card from Sync "converts" the dollar amount to points/credits/etc. such that applicable laws and accounting rules dictate that this sale be reported as revenue and/or taxed, there are two options for the bowling center.
The first is to use SV packages to add value to cards - these are attached to products in Sync and these products can be taxed.
The second is to account in the bowing center's accounting program for the value added to the cards.
Note that in either case, if SV cards are allowed to be used as payment in Sync, the bowling center must be very careful to not count value added to SV cards as revenue/taxable sales and the products sold and paid for by SV cards as revenue/taxable sales or double-counting may occur.
1.7. Desk Peripherals
1.7.1. All in One COM Port Peripherals not Functioning
Environment:
All-in-One client computer
Applicable Version(s):
All-in-One pole display and receipt printer.
Issue:
Pole display or receipt printer do not work on All-in-One computer.
Cause:
No power is supplied to the COM ports used for All-in-one pole display and receipt printer causing failure to operate properly.
Solution:
You have to turn on +12V power to the COM port where the peripheral that requires power is using. One example: Customer Display is plugged into COM 3 by default.
In order to power on the devices, you need to access the BIOS:
Press the Delete button repeatedly during boot, after the POST beep and go to the
Advanced tab. The boot up is fast so be prepared with pressing the Delete button.
Select Intel Advanced Menu.
Select the VGA/COM power Configuration and power ON the desired
ports by selecting +12V (default is None). Please note, only turn power on for the COM
port in which the peripheral requires power.
Press the F10 button to save and exit the
BIOS.
Warning!!!
The powered ports are designed strictly for Touch Dynamic products. Connecting peripherals other than TD rear LCD or 2x20 Customer Display to the powered port will result in the permanent system damage and will void the warranty!!! Do not disconnect or re-connect the devices to the ports while the system is up and running
Applicable Files:
Related Information and Links:
Revision Date:
05/26/2021 - Released to KB
1.7.2. Barcode Scanners
1.8. HD Video Distribution
1.8.1. Channel Plus 5415 HD Manual
Environment:
Vector HD/Sync Scoring
Applicable Version(s):
All
Document Description:
Manual for Channel Plus 5415HD Video Modulator
Applicable Files:
5415HD_Manual.pdf
Related Information and Links:
N/A
Revision Date:
10/19/2017 - Uploaded to KB.
1.9. Media Manager
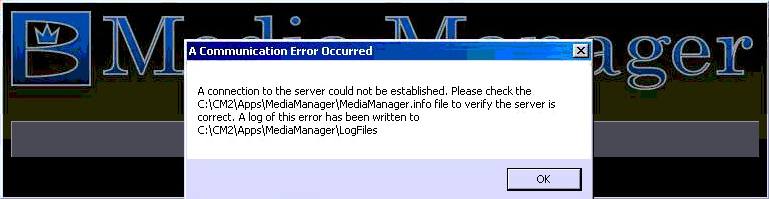
1.9.1. Media Manager on Client Cannot Connect to Server
Environment:
Client computer with Media Manager installed
Applicable Version(s):
All
Issue:
The following error will show when trying to open the Media Manager application from a client computer:
Cause:
Possible Date/Time/Time Zone do not match the server.
Solution:
Ensure all date/time/time zone of the client match that of the server exactly.
The command: net time \\cmserver /set may be run from the client computer in a command prompt window to match the server time exactly. Just answer "Y" to the question that presents after running the command if the time from the server is correct and you want to accept the time match.
Applicable Files:
Related Information and Links:
1.9.2. Media Manager Video Learning
Environment:
Vector Plus/Vector with Media Manager
Applicable Version(s):
All
Document Description:
The zip file contains flash-driven video tutorials on using the Brunswick Media Manager.
Users should start with the Media Manager Main Menu.exe file.
Cannot cash out a lane, or if you select it, it locks the reception payment screen up.
Cause:
There is a locked transaction in the database.
Solution:
1. Insert your Vector disk.
2. Navigate to 6433 Folder on Vector Disk.
3. Run FixTrans.exe.
Applicable Files:
See attachment
Related Information and Links:
Revision Date:
4/15/16
1.10.2. Vector Desk Control and Irfanview Commercial Creation
Title:
Vector Desk Control and Irfanview Commercial Creation
Environment:
Vector scoring
Applicable Version(s):
All
Description:
How to edit Commercial files using the Irfanview program
Applicable Files:
See attachment
Related Information and Links:
1.11. Vector Plus
1.11.1. Patches for Vector Plus
1.11.1.1. Patches for VP 2.x Builds
1.11.1.1.1. Patches for 2.9 Release
Environment:
VP Office
Applicable Version(s):
2.9.10
Issue:
Reservation Planner Monthly Report will not show beyond 2015.
Cause:
Report years are hard-coded.
Resolution:
An updated version of the report selection page has been released to address this issue. This will need to be installed on the server only.
Note:After loading this patch only years that contain reservation data will show in the drop-down selection. This brings the page in line with the rest of the drop-down selections in VP Office.
Steps to Resolve:
Download the ASP file for this issue.
Close VP Office on all computers.
Open Windows Explorer on the Vector Plus server.
Navigate to C:\CM2\Web\CMOffice\Languages\English\Resources.
Copy the updated MonthlyPlannerPicker.asp file into this folder and overwrite the existing file.
Verify that the Select year for the report field now displays only years where the center has reservations.
Applicable Files:
MonthlyPlannerPicker.asp
*Please make sure to unblock any files prior to extracting/installing.
Failure to do so can cause unexpected behavior, or prevent the system from running properly.
Unblocking Files
Related Information and Links:
N/A
Revision Date:
12/16/2015
Environment:
VP Office with External POS Option
Applicable Version(s):
2.9.10
Issue:
First Vector Plus product in the drop-down list is missing when mapping products.
Cause:
Page was bypassing the first value from the database.
Resolution:
An updated version of the report selection page has been released to address the issue. This will need to be installed on the server only.
Steps to Resolve:
Download the ASP file for this issue.
Close VP Office on all computers.
Open Windows Explorer on the Vector Plus server.
Navigate to C:\CM2\Web\CMOffice\Languages\English\CashControl.
Copy the updated POSProductMapping.asp file into the folder and overwrite the existing file.
Close Windows Explorer and open VP Office.
Select Cash Control > Product Mapping and verify that all lane products are present on the drop-down.
Applicable Files:
POSProductMapping.asp
*Please make sure to unblock any files prior to extracting/installing.
Failure to do so can cause unexpected behavior, or prevent the system from running properly.
Unblocking Files
Related Information and Links:
N/A
Revision Date:
03/20/2016
1.11.1.2. Patches for VP 5.x Builds
1.11.1.2.1. Patches for 5.138 Release
Issue:
Reservation Planner Monthly Report will not show beyond 2015.
Applicable Version(s):
5.138.1
Environment:
VP Office
Cause:
Report years are hard-coded.
Resolution:
An updated version of the report selection page has been released to address this issue. This will need to be installed on the server only.
Note:After loading this patch only years that contain reservation data will show in the drop-down selection. This brings the page in line with the rest of the drop-down selections in VP Office.
Steps to Resolve:
Download the ASP file for this issue.
Close VP Office on all computers.
Open Windows Explorer on the Vector Plus server.
Navigate to C:\CM2\Web\CMOffice\Languages\English\Resources.
Copy the updated MonthlyPlannerPicker.asp file into this folder and overwrite the existing file.
Verify that the Select year for the report field now displays only years where the center has reservations.
Applicable Files:
MonthlyPlannerPicker.asp
*Please make sure to unblock any files prior to extracting/installing.
Failure to do so can cause unexpected behavior, or prevent the system from running properly. Unblocking Files
Related Information and Links:
N/A
Revision Date:
11/28/2016
Issue:
Support for VX805 Pinpad
Environment:
VP Payment Card with VX805 Terminals
Applicable Version(s):
VP 5.138.1
Cause:
Device was not released when the software build was created.
Resolution: (Updated 10/01/2014 with new SIM.dll to address VX805 Lockups)
The patch below will need to be installed on both the server and clients. No bowling activity should be going to due to required reboots.
1. Close PC Charge and VP Desk on the server and all clients.
2. Download and unzip the VX805 Card Terminal patch to a USB drive. Make sure to unblock the file before unzipping.
Server Update:
1. Reboot the Vector Plus server.
2. Log onto the server with an administrator account, such as owner.
3. Connect the USB drive to the server computer.
4. Navigate to the location on the terminal patch on the USB drive.
5. Run the batch file InstallonServer.bat.
6. The process will run and notify you to press space when complete. Refer to ServerUpdate_Success.txt in the patch folder for the results you should see.
7. Check the Event Logs to verify that there are no errors related to Card Management.
Client Update: 1. Reboot the Vector Plus client. 2.Log onto the server with an administrator account, such as owner. 3. Connect the USB drive to the client computer. 4. Navigate to the location on the terminal patch on the USB drive. 5. Run the batch fileInstallonClient.bat. 6. The process will run and notify you to press space when complete. Refer toClientUpdate_Success.txt in the patch folder for the results you should see. 7. Open VP Desk and verify no errors appear. 8. Check the Event Logs to verify that there are no errors related to Card Management.
Applicable Files:
VX805CardTerminal - V5.zip
*Please make sure to unblock any files prior to extracting/installing. Failure to do so can cause unexpected behavior, or prevent the system from running properly.
Release Notes for the 2.8.38 version of Vector Plus. This version is also referred to as Vector Plus 2.8 Service Pack 2.
Applicable Files:
VP 2.8.38 Release Notes.pdf
Related Information and Links:
1.11.2.1.2. VP 2.9.10 Release Notes
Environment:
Vector Plus Installation
Applicable Version(s):
2.9.10
Document Description:
Release Notes for the 2.9.10 version of Vector Plus. This version is used by location that are running legacy hardware and require a new server and/or clients.
Applicable Files:
VP 2.9.10 Release Notes.pdf
Related Information and Links:
1.11.2.2. VP 5.x Releases
1.11.2.2.1. VP 5.138.1 Release Notes
Environment:
Vector Plus Installation
Applicable Version(s):
5.138.1
Document Description:
Release Notes for the 5.138.1 version of Vector Plus
Applicable Files:
VP 5.138.1 Release Notes.pdf
Related Information and Links:
Posted Values
1.11.3. Vector Plus How-To Guides
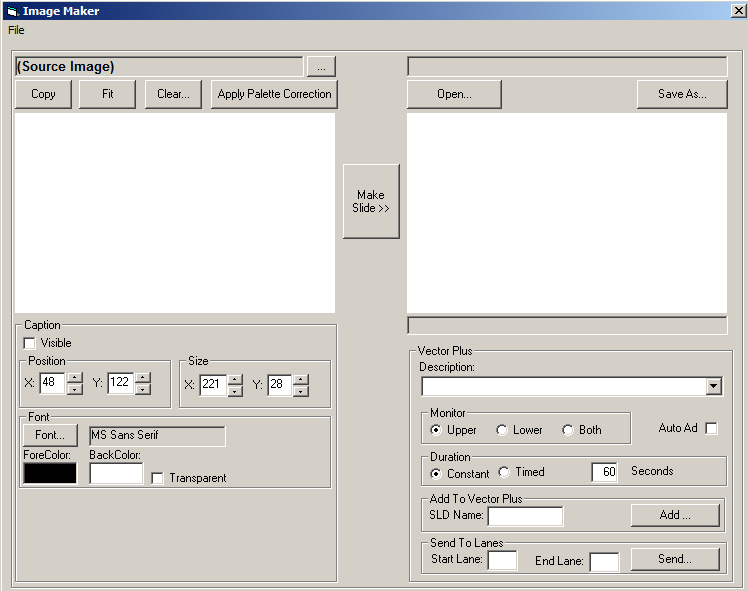
1.11.3.1. Creating Frameworx Slides with Image Maker
Environment:
Vector Plus POS with Frameworx Scoring
Applicable Version(s):
All
Procedure:
This document will be broken into different sections to properly cover the use of this tool.
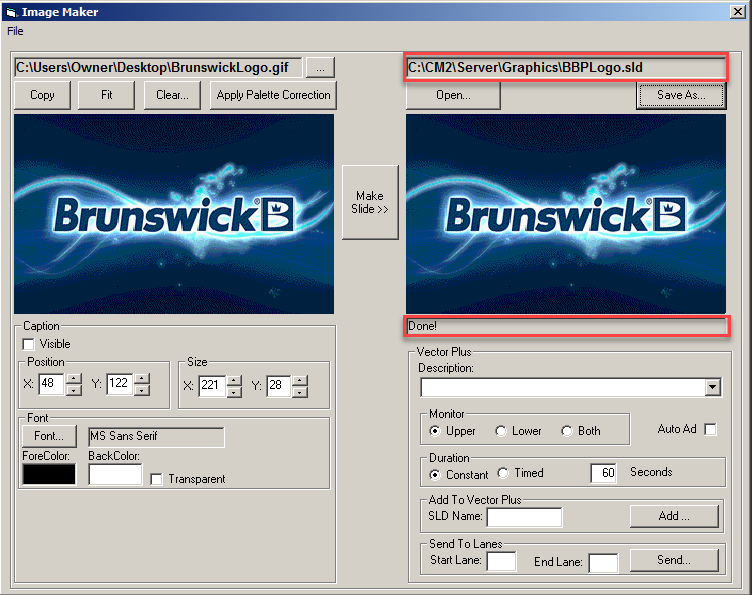
Image Maker Application
ImageMaker is an accessory product included with the Vector Plus system. It is a tool used to create graphic slides that can be displayed on the Frameworx scorer monitors.
The Frameworx scoring system can display graphic images on the lower and upper monitors. The images that can be displayed are limited in two respects, resolution (size) and color depth (the number of colors the image contains).
The size limitation is 320 pixels wide and 200 pixels high.
The color depth is limited to 256 simultaneous colors.
While many source images may exceed these limitations, ImageMaker can adjust the image to match the capability of the scorers. Some loss in picture quality can be expected when the image is scaled to meet the scorer requirements. Choosing the source images carefully will improve the final results.
Source Image Considerations
The most common image file types are .bmp, .jpeg and .png, but there are a wide variety of formats used by various content producers. There are some problems with using these types of images for the Frameworx scorer:
File size – Graphic files are typically large, and can contain millions of pixels. The file size is dependent upon the quality of the camera that is being used and the resolution setting of the image that is being created. The ideal dimensions for a Frameworx image are 300px*200px (pixels).
Color Depth – Graphic files are saved as millions of colors, whereas the Frameworx scorer is capable of only displaying 256 colors.
The ImageMaker application will allow conversion of .jpeg or .bmp files by using the Fit and Apply Palette Correction buttons. However, significant loss of picture quality can occur. If the file used for the source image is first resized, and converted to a .gif file format, the quality of the image can be greatly enhanced. The resulting image will display much better on the Frameworx scorer when a slide is created.
A GIF image employs lossless data compression so that the file size of an image may be reduced without
degrading the visual quality, provided the image can be rendered with only 256 colors. This limitation
makes the GIF format suitable for color photographs (which are more commonly seen in the JPEG
format). This format is also well-suited for more simple images, such as graphics, or logos with solid
areas of color.
Once you have the graphics file in the proper format we can now process the image into a Frameworx compatible slide.
Using ImageMaker
Navigate to the C:\CM2\Tools\CmImageMaker\ folder and double click on the file CMImageMaker.exe
A shortcut can be created and placed on the Desktop if desired for easier access.
The application will open and the following display will be presented.
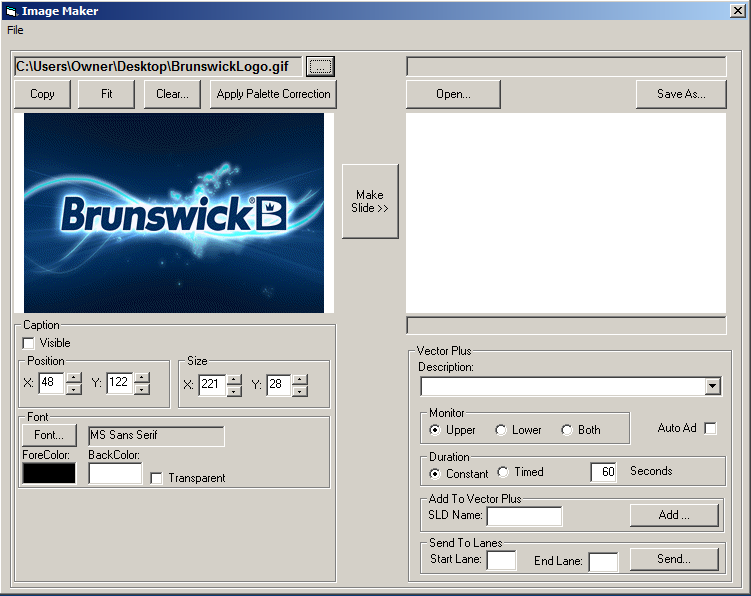
Click on the […] button to select the source image. Navigate to the location for the image, click the image to highlight it, and click Open.
The ImageMaker program will now display the file on the left side of the application.
Click the Fit, followed by Apply Palete Correction buttons to verify the image the properly formatted.
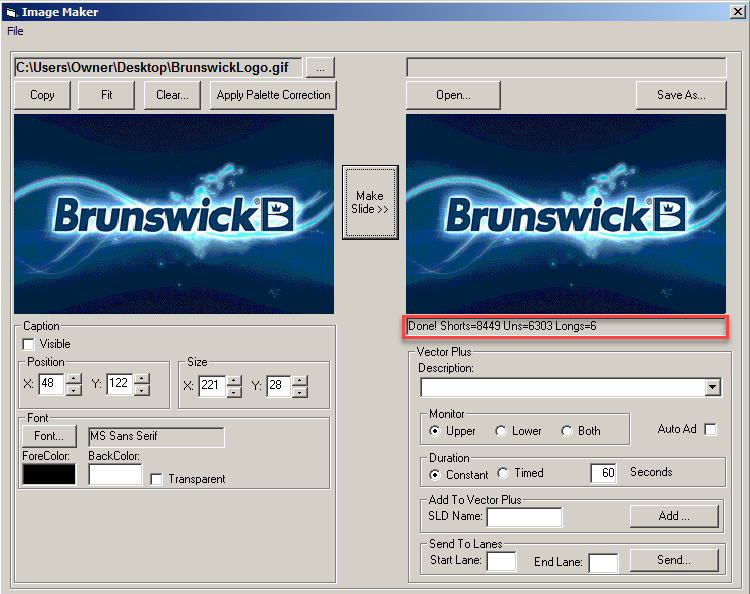
Click the Make Slide button to process the image into the Framework Slide format. Verify that no errors are shown in the field below the right side image.
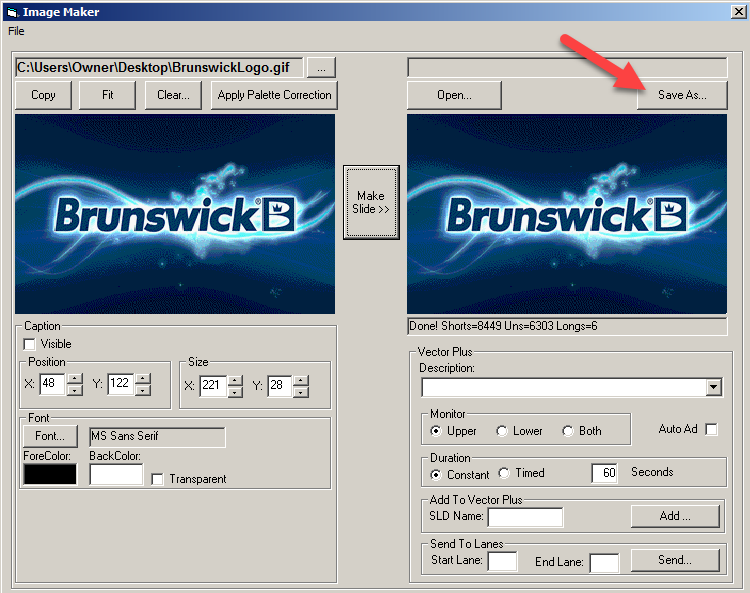
The graphic is now ready to be saved as a Frameworx compatible slide. This slide must be stored in the correct directory in order to be available at the Desk Application.
Click the Save As... button located above the slide image. In order for the image to be used by the system you will need to save the file to C:\CM2\Server\Graphics. CRITICAL: The file name for the image cannot be more than 8 characters. Longer names are not compatible with the scorer, and can cause the scorers to lock up.
Once you have entered the appropriate name click Save. The file name will display above the slide after a successful save, and the lower display will show Done!.
While there is a section here shown to add the slide directly into Vector Plus, this section is inoperable. In the following section will we cover how to link the new slide to Vector Plus.
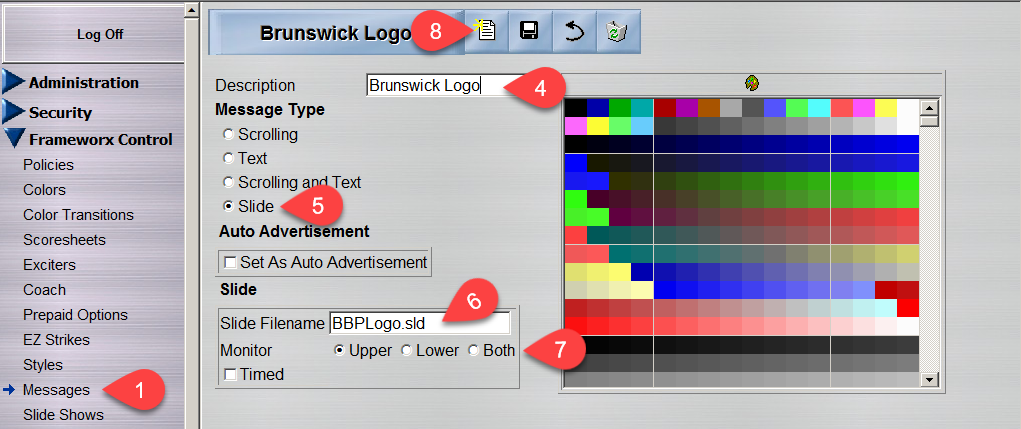
Creating Slide for Vector Plus
Open Vector Plus Office.
Select Frameworx Control, and then Messages.
The Messages screen should appear blank, which is needed to load the slide.
Under the Description field, enter the name of the slide as you would want it to appear.
Under the Message Type section, select Slide.
Under the slide filename type in the name of the file you created. Based on the example above this would be BBPLogo.sld.
Set the Monitor Type, if changes are needed.
Click the New button to create the slide record.
The slide is now ready for use from Desk.
Applicable Files:
N/A
Related Information and Links:
N/A
Revision Date:
05/01/2020 - Released to Knowledgebase.
1.11.3.2. Resetting accounts for a new season with VP 2.8
Environment:
Vector Plus CNS
Applicable Version(s):
2.8 and later
Procedure:
When working with accounts in the Vector Plus system, the recommended procedure is to reset the accounts for each new season. The Vector Plus receipt numbers are reused every 7 years, which will cause accounts to fall out of balance if not reset.
The process below will provide guidance on what should be done to reset the accounts each season, or to reset accounts that have already begun to show balance inconsistencies due to long-term usage without being reset.
This process will need to be done for each account in the system.
Reset Accounts:
Write down or print out the account details for each account.
Make a single adjustment in VP Office to zero out the account.
Once the balance is at zero you will need to delete the account.
Once the account has been deleted from the main screen, it is moved under the Deleted Accounts section in cash control. You will need to delete the account from there as well.
For a non-League Payment connected account, you can now create the new account from the Accounts screen as before.
For a League Payment connected account, you will need to go into Competitions > League Payments, select the league from the drop down, then re-select the charge and/or prize fund sub departments, and then save the settings. This will automatically create new accounts for you.
Applicable Files:
N/A
Related Information and Links:
N/A
Revision Date:
09/12/2018 - Released to KB.
1.11.4. VP Export Utility
Environment:
Vector Plus locations
Applicable Version(s):
Documentation is based on VP version 7.0.7
Document Description:
User guide and data field explainations
Applicable Files:
VP Journal Log Export Field Descriptions.docx
VPExport User Guide.docx
Related Information and Links:
N/A
Revision Date:
05/14/2022 - Released to KB.
1.11.5. VP League
1.11.6. VP Mechanic
1.11.6.1. Cash Drawer Will Not Open but Receipt Printer Works
Environment:
Serial port settings for cash system
Applicable Version(s):
All
Issue:
Cash drawer won't open, but pole display and receipt printer may function normally.
Cause:
The check box for the CMS compatible option may be selected indicating legacy cash peripheral hardware, but the peripherals are not legacy.
Legacy hardware includes Star printers, intelligent cash drawers, and beige colored customer displays (pole display).
Solution:
Remove the check mark for CMS Compatible. Only check the CMS compatibility box for legacy pole displays, receipt printers, and cash drawers.
Applicable Files:
Related Information and Links:
Revision Date:
3/10/2016
1.11.7. VP Office
1.11.7.1. Daily Reports Automatic Email Option Fails to Send Email
Environment:
VP Office > Daily Reports
Applicable Version(s):
6.629 and higher
Issue:
The email for the Daily Reports is not sending properly.
Cause:
Either lack of Internet connection on the server, lack of repository folder for .pdf report or a configuration setting in VP Office > Daily Reports is incorrect. Typically, the SMTP, Port assignment or SSL designation is incorrect.
Solution:
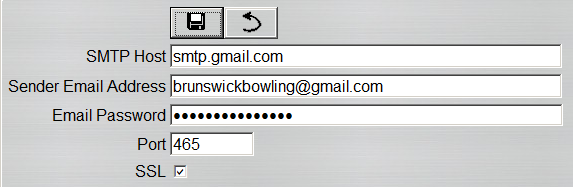
Ensure all required fields of the Daily Reports section are filled in with correct and working information. The attached document describes all required fields and explains how to use the Daily Reports feature.
The following information can be utilized in the Email Settings section to test and validate that the Daily Reports is working properly:
SMTP Host: smtp.gmail.com
Sent email address: brunswick.tester@gmail.com
Email password: brun5w1ck
Port: 465
SSL: checked
Applicable Files:
'Automatic Daily Reports.pdf'
Related Information and Links:
Revision Date:
09/19/2018 - Released to KB
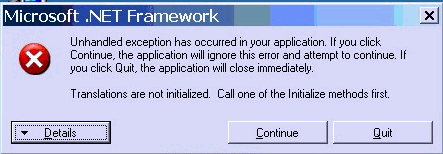
1.11.7.2. Microsoft .NET Framework unhandled exception error logging into Office from any client or server.
Title:
Microsoft .NET Framework unhandled exception error logging into Office from any client or server.
Environment:
Vector Plus CNS System
Applicable Version(s):
This tip applies to Vector Plus version 5.xxx
Issue:
The following error shows when logging into Vector Plus Office from any client or server.
Cause:
The c:\CM2\Translations\CMEnglish.mdb file is corrupted.
Solution:
Copy the c:\CM2\Translations\CMEnglish.mdb from the Vector Plus version 5.xx update cd to the c:\CM2\Translations folder.
Applicable Files:
Related Information and Links:
1.11.8. VP Options
1.11.8.1. VP Ticket Depot
1.11.8.1.1. Ticket Depot does not Dispense Tickets
Title:
Ticket Depot does not Dispense Tickets
Environment:
VP Desk
Applicable Version(s):
VP with Ticket Depot (VP 5.124 and newer)
Issue:
Ticket Depot units will not dispense tickets nor automatically disable after a game
Cause:
This means the Ticket Depot units are not receiving any Vector Notification messages.
Solution:
Verify that the Ticket Depot option CD has installed in the center by checking the server for a service called "Brunswick Ticket Depot Service". Next, check that the Ticket Depot feature is activated in Site Management. If the service is present on the server but the feature is deactivated in Site Management, follow the steps below. Otherwise, you have not run into the issue that this solution solves.
If the feature should be activated, activate it via Site Management.
If the feature should not be activated, disable the "Brunswick Ticket Depot Service".
Applicable Files:
Related Information and Links:
1.11.8.1.2. Ticket Depot Installation and Vector Plus Users Guide
Environment:
Ball lift area and Vector Plus CNS system
Applicable Version(s):
Vector Plus 5.104 and higher with Vector Scoring
Document Description:
These documents describe the Ticket Depot system installation and use.
Applicable Files:
'Ticket Depot Installation 57-900080 - 1-14.pdf'
'Ticket Depot_Vector Plus User Guide.pdf'
Related Information and Links:
Revision Date:
09/06/2019 - Released to KB
1.11.9. VP Tournament
1.11.10. VP User Guides
1.11.10.1. Vector Plus - Creating Commercials
Environment:
Vector Plus CNS with Vector Scoring
Applicable Version(s):
All Versions, but primarily for locations unable or not using the Brunswick Media Manager application.
Procedure:
The attached PDF documents cover the procedures to create and load commercials for Vector Scoring on all versions. It is recommended for center running XP/2003 and later to use the Brunswick Media Manager application to handle all graphics.