1. Lane Components
1.1. Ball Detect
1.1.1. Lane Opposite of the Lane the Ball is Thrown on Will Randomly Cycle and Possibly Score
Environment:
Ball Detect
Applicable Version(s):
All
Issue:

A lane may randomly cycle and might even score when the opposite lanes ball thrown passes by, or has just passed by its ball detect. The lane with the random cycle and score may or may not be in use and could have no activity at all.

The attached video is an example of the issue. The ball detect is adjusted, but the mounting is loose. As the ball is thrown on lane 17, lane 18 ball detect will activate and flicker due to vibration from the looseness. 

Cause:

The kickback wood that the ball detects are mounted to is loose.

Solution:
Adjust ball detect after ensuring that the hardware the ball detects are mounted to is tightened down and not loose at all.
Applicable Files:
'BallDetectOppositeLane.mp4'
Related Information and Links:
Revision Date:
10/31/2019 - Released to KB

 
1.1.2. No GS-X Ball Detect Signal On Lane Pair
Environment:
Foul unit PCB
Applicable Version(s):
All GS-X Pinsetters with Nexgen Electronics
Issue:

No GS-X ball detect signal from left or right lane. The Zot foul unit is incorrectly set to the incorrect voltage on older units or the jumper is set to AMF and not BW on new style Zot foul units.


Solution:
Voltage should be set to 5 volts, not 12 volts on older units and the jumper must be set to BW on new style foul units not AMF.
Related Information and Links:
Revision Date:
3/10/16 - Released to KB
1.1.3. Score Shows on Opposite Lane after 2nd Ball is Thrown
Environment:
Ball Detects
Applicable Version(s):
All
Issue:

The score of the 1st and 2nd ball thrown from a lane shows up on the opposite lane and only after the 2nd ball is thrown.

Example: A ball is thrown on lane 5. The 1st and 2nd ball scores from lane 5 will show on lane 6 after ball 2 is thrown on lane 5.

Cause:
The ball detect cables are reversed for each lane.
Solution:
Ensure the ball detects are properly connected and represent the correct lane. Be careful of mistakenly reversed labeling of cables.
Applicable Files:
Related Information and Links:
Revision Date:
6/21/2018 - Released to KB

 
1.2. Brunswick Intellishield
1.2.1. Intellishield Codes
Environment:
Brunswick Intellishield with Sync CNS
Applicable Version(s):
All
Document Description:

Below are the codes reported by the Intellishield system to Sync:

001 – Powered on
002 – Light curtain clear for 5 seconds
003 – Foreign object
004 – Ball stopped in the mouth
005 – Ball recognized
006 – Calibration button pushed for 5 extra balls
007 – Calibration button pushed for full calibration


Revision Date:

12/03/2018 - Released to KB.

09/23/2020 - Updated codes list 


1.2.2. Brunswick Intellishield (Infrared Ball Lift Safety Device) 53-900678-000
Environment:
Where the ball exits the ball lift at the opening of the Frameworx Ball Rack.
Applicable Version(s):
All
Document Description:
This document will assist the user in installing the Brunswick Intellishield.
Applicable Files:
'Intellishield_57-900678-000.pdf'

Revision Date:
05/09/2017 - Released to KB

 
1.2.3. Intellishield Troubleshooting and Programming
Environment:
Where the ball exits the ball lift at the opening of the Frameworx Ball Rack.
Applicable Version(s):
All
Procedure:
This document describes the troubleshooting steps for Intellishield.
Applicable Files:
'Intellishield Troubleshooting and Programming.pdf'
Related Information and Links:
Revision Date:
08/08/2020 - Released updated version of document.
08/08/2019 - Released to KB

 
1.2.4. Intellishield with Sync Interface Instructions
Environment:
Intellishield control box and Sync Office
Applicable Version(s):
All
Procedure:
See attachment
Applicable Files:
'Intellishield with Sync Interface Instructions.pdf'
Revision Date:
01/18/2019 - Released to KB

 
1.3. Foul Units
1.3.1. AMF Radaray Foul Unit to 360 Controller Modification Diagrams
Environment:
360 Controller to AMF Foul Unit
Applicable Version(s):
Vector Plus and Sync
Document Description:

These images show the modifications that apply when connecting the AMF Radaray Foul Unit to the 360 Controller.


Applicable Files:

'360_Controller_Bottom_Connections.png'

'360_Controller_Foul_Ball_Lift_and_Ball_detect_harness.png'

'AMF_Radarray_Foul_Unit_to_360_Controller_Connection.png'

Revision Date:
11/28/2017 - Released to KB

 
1.4. Masking Units
1.4.1. Video Masking Units
1.4.1.1. Lanescape V1
1.4.1.1.1. Lanescape V1 Software
Environment:
Brunswick Lanescape VMU
Applicable Version(s):
Original Video Masking Units
Procedure:

Installation Steps:

  1. Download the attached zip file.
  2. Open the properties of the zip file and unblock if applicable.
  3. Extract the filer to a folder on the desktop.
  4. Run Setup.exe to start the installation process.
  5. Follow the on-screen instructions.
Applicable Files:
'LaneScapeVMUv1.zip'
Related Information and Links:
Revision Date:
06/11/2019 - Added to KB.

 
1.4.1.1.2. Lanescape Video Masking Unit v1 Manuals
Environment:
Lanescape Video Masking Unit system
Applicable Version(s):
Original v1 Lanescape Video Masking Unit system
Document Description:
These are the manuals that apply to v1 Lanescape.
Applicable Files:

"Lanescape Video Masking Installation manual 53-900452 11-10.pdf"

"Lanescape Video Masking Unit Operations 53-900181-000.pdf"

"Lanescape-Video-Masking-Unit Preinstallation-Manual 10-095400-049_r1110-17.pdf"

Revision Date:
5/7/2018 - Released to KB

 
1.4.1.2. Lanescape V2
1.4.1.2.1. Draper Software Package for the 2nd Generation controllers (5/2016 and later installs)
1.4.1.2.2. Lanescape Control Issues with Draper Release 2 Software
Environment:
Lanescape Video Masking Units
Applicable Version(s):
Drapers latest software release version 2 and new controllers
Issue:

Draper commands acting very sporadic. For example: Trying to put all screens up or down produce different results each time.

  • Some may not move at all until you send the command again.
  • Some may go all the way up or down while others stop half way. 
Cause:
Multiple instances of Draper are software running in the background on the computer that Draper is installed on.
Solution:
  1. Issue the command to get all screens up or down until they are all in the same position. You may have to send this command multiple times before all screens align.
  2. Go to task manager and end task on all instances of Draper.
  3. Open just one instance of Draper and test functionality.
  4. If they are still acting sporadic, repeat step one, then reset each controller board by removing the middle cover and pressing the reset button on the bottom right hand side of the board.


Revision Date:
08/11/2017 - Released to KB

 
1.5. Power Lift System
1.5.1. Frameworx Power Lift will not come on with GS-X Pinseters with Nexgen Electronics
 
Environment: Frameworx Powerlift only
Applicable Version(s): NA
Issue: Frameworx Power Lift will not come on with GS-X Pinsetters with Nexgen Electronics

Cause: Any one or more of the following listed below could be the cause of this issue.

- The ball rack safety switch plate is in the down position.

- The on/off switch at the silver electrical control box is in the OFF position.

- There is not proper voltage present at the green and white wires at the lower R.H. corner of the P20 connector of the Nexgen Box.

- The coils of both relays inside the electrical box may not have proper voltage.

- Overload is tripped.

Solution:

1. Check the ball rack safety switch plate to ensure it is located in the up position. The safety switch is located just behind the top power lift tire in the lift.

2. Make sure the on/off switch at the silver electrical control box on the side of the power lift is in the ON position.

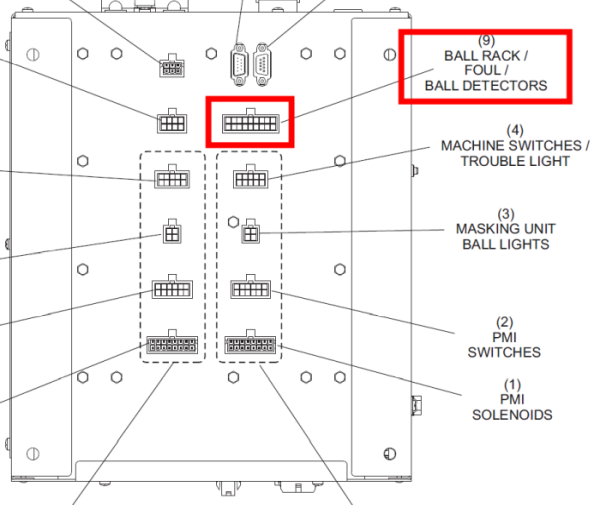
3. Locate the P20 Connection at the Nexgen Box and using a meter set on AC volts probe the green and white wires at the lower R.H. corner of the connector. This should read 26 to 28 vac with pinsetters turned on. If there is no voltage present replace the CPU PCB. 

4. If voltage is present, check for the same voltage to the coils of both relays inside the electrical box on the side of the lift up front. If there is no voltage present at either relay coil the cable must be checked from the Nexgen box to the electrical box on the side of the power lift. There should only be voltage present at the coil of one of the two relays. If voltage is present and the power lift is still off, first push in the red overload switch on the Power Lift Motor.

6. If the overload is not tripped, replace the relay in the control box that has voltage present to it. 

Note: When using Frameworx power lifts with GS-X pinsetters with Nexgen Electronics, only one relay of the two are used. So each lift should have a spare relay.