This procedure will help with troubleshooting the Authority22 Traction Drive Motor in the event that the motor will not run or the motor does not drive the machine correctly up or down the lane during operation. The Authority22 may also display an Encoder Sensor Error if the machine is not traveling down the lane at the correct speed. The Authority22 Drive Motor is a DC motor and is rated at 90 VDC. The voltage to this motor is generated from the conversion of 115 or 230 VAC to DC voltages to run the motor. To accomplish this, AC voltage from the Motor Control Board is applied to the Regenerative Drive. It is then converted to DC voltages to allow the Traction Drive Motor to run in the correct direction and speed up and down during operation on the lane. Refer to Figure 1. By taking voltage measurements at the Traction Drive Motor Connector, Regenerative Drive, Motor Control and Machine Control PCB the user can determine which part will need replacement. Tools Required: - Digital Voltage Meter that is able to measure AC and DC Voltages.
- Phillips Screwdriver #6
1. Checking Traction Motor for Operation. - Using the Graphical User Interface, (GUI) Keypad, navigate to Maintenance > Diagnostics > Drive. Refer to Figure 2.
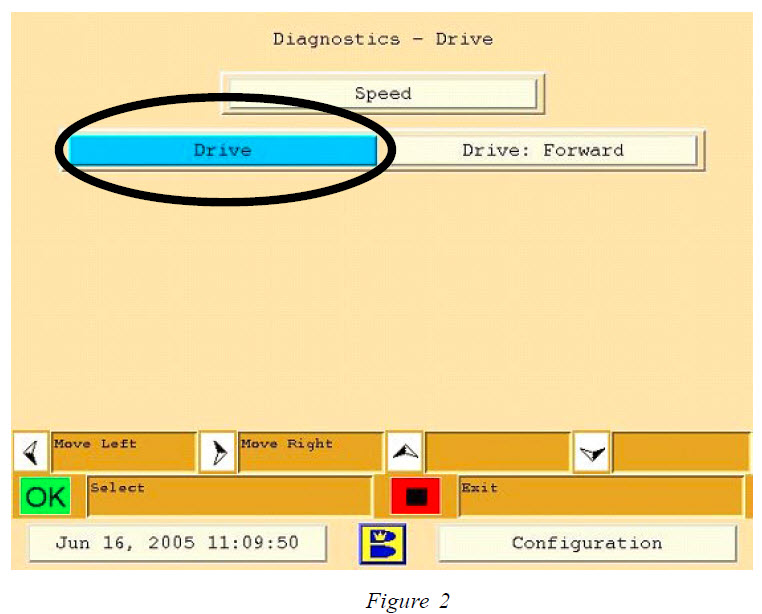
- Using the GUI Keypad, select “OK” to
run the Drive Motor Forward and Reverse. If the motor fails to run in either
direction, check these items:
A. Looking from the T handle side, check the Traction Drive Motor Connection on the left hand side of the electrical enclosure. Check and make sure the connection is good and there are no wire pulled out of frayed. Follow the cable to the motor looking for pinched or cut wiring. B. Check the fuse on the Motor Control PCB at location F16 inside the Electrical Enclosure. You will need a #6 Phillips head screw to remove the six screws from the top cover. Leave the cover connected to the emergency stop. This fuse is a 4.0 amp slow blow fuse 5mm x 20mm part # 14-860-214-000. If this fuse is not blown move to step #2 “Checking Drive Motor Resistance”. 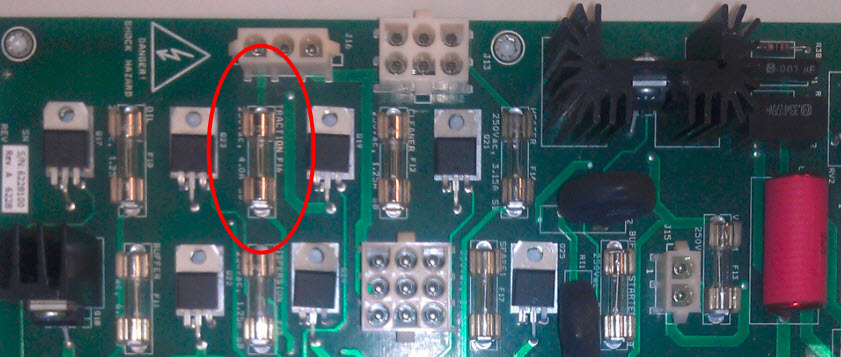
Note: When checking the fuse, refer to the following Warning. WARNING!!! Disconnect Power by moving the red toggle switch located on the side of the electrical enclosure to the down position and unplug the main power cord to the Authority22. Remove the GUI and set the GUI aside until the electrical cover can be removed. Remove the 6 screws that secure the top cover to the electrical enclosure. Remove the top cover leaving the emergency stop switch cable connected. Locate the traction drive motor fuse F16 on the motor control PCB and check the fuse for continuity with a meter set in the ohms position to determine if the fuse has been blown. Replace with 4 amp 250 volt slow blow fuse part # 14-860214-000 if necessary. 2. Checking Drive Motor Cable and Motor Resistance. Locate the Traction Drive Motor Connector and disconnect it from the Electrical Enclosure. Using a voltage meter, select the Ohms setting on the meter and attach the red lead to the brown wire terminal inside the connector and connect the black lead from the meter to the blue wire terminal inside the connector. Resistance shown should be 4 to 5 Ohms. If no resistance is shown, the Traction Drive Motor or cable may be defective and must be repaired or replaced. If resistance is shown, reconnect the drive motor connector to the electrical enclosure and move to step #4 “Checking AC Voltage”. Refer to Figure 3. 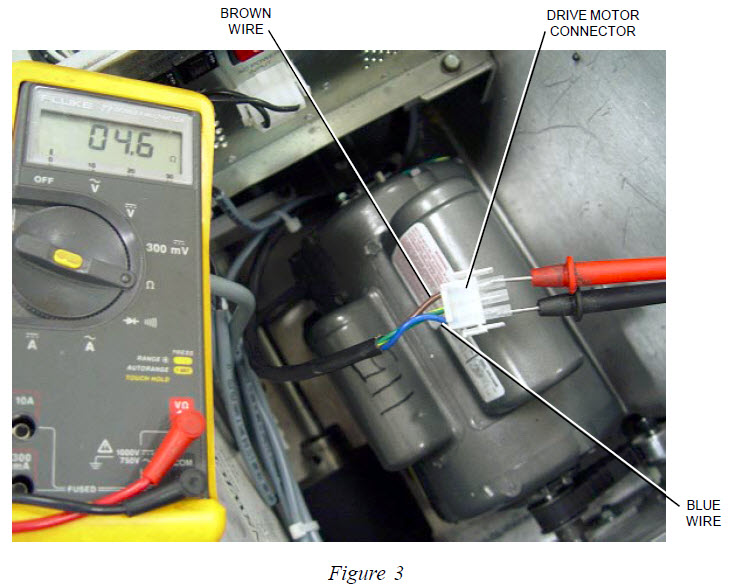
WARNING!!! The Authority22 must be powered on to perform some of the remaining checks. Extreme caution is advised when taking voltage measurements and only qualified personnel should perform these readings. 3. Checking Drive Motor Voltage. Reconnect the Drive Motor Connector back into the Electrical Enclosure. Install the red lead from the voltage meter to the brown wire location inside the connector, and the black lead to the blue wire location inside the connector. Select the VDC setting on the meter. Run the Traction Drive Motor in diagnostics as in Step 1. The reading should be +21 to +22 VDC when the motor is run in the forward direction and -21 to -22 VDC when the motor is run in the reverse direction. If these voltages are correct in Step 3, this indicates that the DC voltages from the Regenerative Drive are correct and the drive motor should operate correctly. Recheck the Traction Drive Motor and cable resistance as described in Step 2 or replace the Traction Drive Motor. If voltages are low or incorrect refer to Step 4 to troubleshoot the Regenerative Drive and the Motor Control PCB for correct operation. 4. Checking AC voltage to the Motor Control PCB and from the Motor Control PCB to the Regenerative Drive. Locate the connector J12 located at the top of the Motor Control PCB. Using a voltage meter set to AC Volts, attach one lead to the black wire inside the connector and the other to the white lead inside the connector. With power applied to the machine, this reading should be 115 +/- 10% or 230 +/- 10% VAC depending on incoming voltage to the lane machine. If there is no voltage present, check incoming voltage to the Authority22. If voltage is present, check for the same voltages mentioned above at connector J16. If there is AC voltage at connector J12 and no voltage at J16 replace the Motor Control PCB. If there is voltage at J16 continue to the next step. 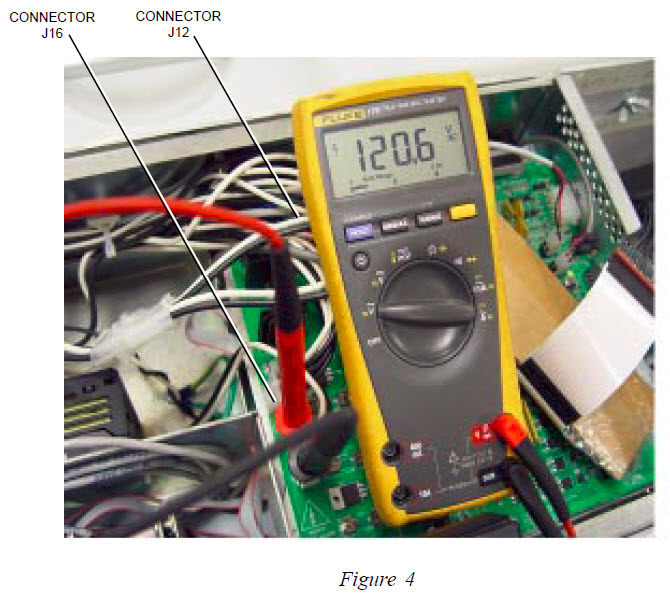
5. Checking Regenerative Drive DC Voltages. There are 5 colored wires attached at the top of the Regenerative Drive. Refer to Figure 5. Taking voltage readings at these wire locations will tell if the Regenerative Drive has the correct voltages necessary to drive the Traction Drive Motor. Note: Make sure all 5 wires are stripped and connected properly to the Regenerative Drive. Using a voltage meter, select the VDC setting and attach the black lead from the meter to the black common wire location, and attach the red lead from the meter to the green wire location at the Regenerative Drive. Refer to Figure 5. This should read -15 VDC while running the drive motor in the either direction. Keep the black meter lead to the black wire location and attach the red lead to the red wire location. This should read +15 VDC while the motor is running in either direction. If there is no voltage present in either direction, replace the Regenerative Drive. 6. Checking DC Voltage Signal to the Regenerative Drive. Refer to Figure 5. Locate the Black Wire (Common) and the White Wire (Signal) at the Regenerative Drive. Using a voltage meter, select the VDC setting and attach the black lead from the meter to black wire location and the red lead to the white wire location. While running the Drive Motor in diagnostics, check for +2 to +3 VDC while running the motor in the forward direction and – 2 to – 3 VDC in the reverse direction. If there is no voltage present or the voltage is below -2 or +2 in the forward or reverse direction the Motor Control PCB or the Machine Control Board has failed, continue to Step 7 to determine if the Motor Control PCB or the Machine Control PCB will need replacement. Note: As a final check to determine if the Regenerative Drive or the Motor Controller PCB is giving a incorrect signal, remove the white wire and re-test with step #6 with the red lead on the white wire and not connected, and the black lead connected with the black wire position. If the signal is zero or under 2 volts forward or reverse, it is the Motor Controller PCB. If the signal voltage is 2- to 5 volts forward or reverse the problem is coming from the Regenerative Drive PCB. Sometimes the Regenerative Drive will feed back voltage from the signal line causing incorrect signal readings. By disconnecting the white wire and testing we are getting a true reading from the Motor Controller PCB. 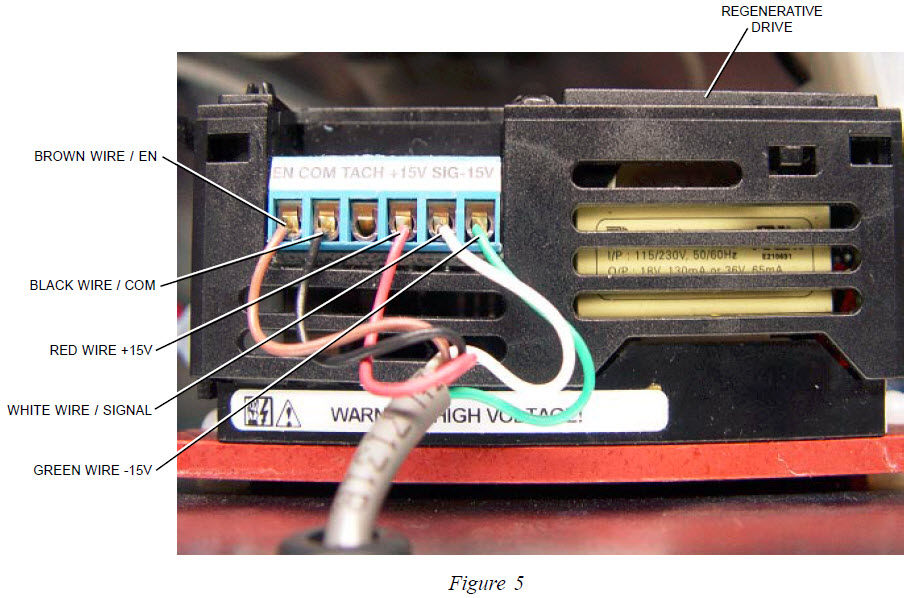
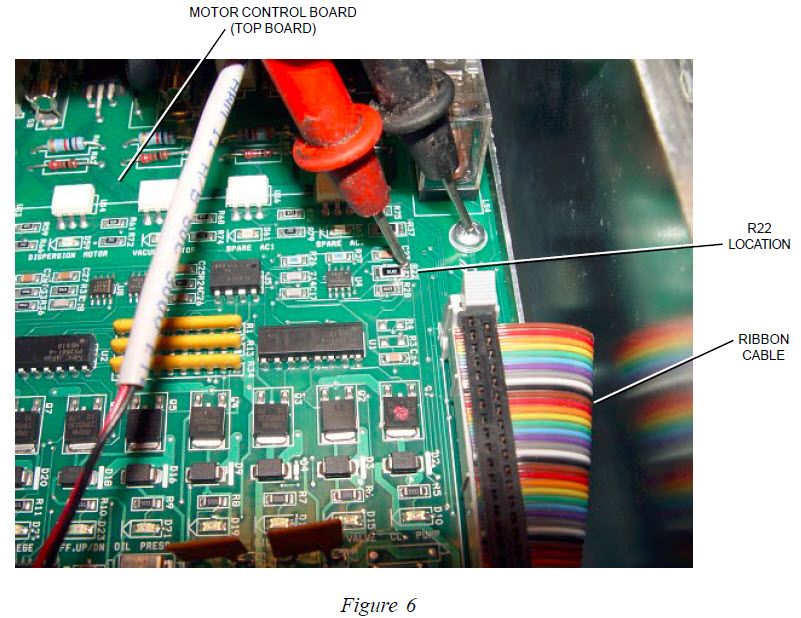
7. Checking for Correct Voltage from the Machine Control Board. Before taking voltage reading, make sure the ribbon cable to the right of R22 is fully seated into the Motor Control PCB and the Machine Control PCB. Using a voltage meter, select VDC and attach the black wire lead to the Phillips head screw for ground, and the red lead to the top of R22. Refer to Figure 6. This reading should be between 2 to 5 VDC while running the Drive motor in the reverse or forward directions. If there is no voltage present, or the reading is below -2 or +2 replace the Machine Control PCB, the bottom board inside the electrical enclosure. If the correct voltage is present, replace the Motor Control PCB. Quick Notes: - A weak signal from the machine controller PCB or motor controller PCB of -2 or +2 the machine will run slow. This signal must be above 2 volts + or – to obtain the proper speed.
- Normally, if the drive motor will run one direction or the other this means you have 120 or 230 volts to the regenerative drive PCB.
 |