|
The Authority22 and Envoy lane machines have used different
types of "End of Lane sensors" since their inception. The current part number for
the sensor is 14-100235-091. This sensor (3rd Gen) can be used in both the Authority22 and Envoy
lane machines.

Authority22 End of
Lane (EOL) sensor types:
1st Generation was an adjustable type that was
3-1/8” long (85.3mm).
2nd Generation was a photo-optical type that was 2-1/8”
long (55mm) and is NOT adjustable.
3rd Generation (Current) is an adjustable type
that is 1-1/4” long (33mm).
Envoy End of Lane
(EOL) sensor types (Same as A22):
1st Generation was a photo-optical type that was
2-1/8” long (55mm) and was NOT adjustable.
2nd Generation was an adjustable type that was
1-1/4” long (33mm).
Authority22 1st
Generation End of Lane Sensor Replacement and Adjustment
The Authority22 first generation End of Lane sensor is a Capacitive
Proximity Switch. The base is 3-5/16” long (85.3mm) and is adjustable.
Tools needed:
Replacing the 1st
generation (A22 Only) End of Lane Sensor
1. Place machine in transport position with the cover open
and power supply disconnected.
2. Loosen and remove nut at base of sensor.
3. Remove black O-ring from base of sensor.
4. Disconnect sensor cable from the quick-connect cable harness.
5. Pull sensor out from the top side of the machine and remove the second
O-ring on top side of the sensor.
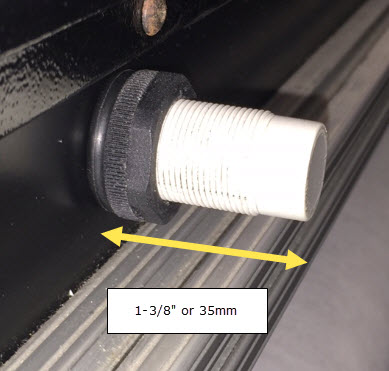
6. Place an O-ring under the top-side nut and then install new sensor from top
side of the machine so that sensor extends 1-3/8" or 35mm beyond shield.
Note: The
sensor must be set in proper position for accurate operation.
7. Place the second O-ring on the sensor pushing it up to
the bottom side of the mounting shield.
8. Insert and tighten nuts at base of sensor.
*** Do NOT over tighten nuts ***
9.
Adjust sensor as needed.
Adjusting the 1st
generation (A22 Only) End of Lane Sensor
Tools Needed:
-
Small screwdriver included in the spare parts
kit.
-
An accurate measuring device
-
(2) 15/16” wrenches or adjustable wrench
- Place machine in operating position with power supply
connected.
- This sensor must be set in proper position and at the
proper sensitivity for accurate operation.
- To adjust the physical position of the sensor, verify that the sensor extends
1-3/8" (35mm) beyond shield at its base and adjust if necessary using the
15/16" wrenches or adjustable wrenches.
- To adjust the sensitivity of the sensor, use a small screwdriver supplied in
spare parts kit, to increase (clockwise) or decrease (counterclockwise) the
sensitivity adjustment (yellow slotted dial). The factory-set position is with
the slotted dial at approximately 3 o’clock.
- While the machine is on the approach, the LED on the sensor should be Off.
Rotate the sensitivity adjustment clockwise so the LED turns On and then
counterclockwise so it is Off. Place finger underneath sensor and the LED
should turn On and then Off once the finger is removed. If the light stays
on, then adjust sensitivity down (counterclockwise).
- Run the lane machine to verify proper sensitivity adjustment, if it returns
too early then increase the sensitivity.
- Verify that the end-of-lane sensor does not contact the lane when the front
lane-to-lane castors drop into the gutter at the foul line.
Authority22/Envoy
2nd generation End of Lane Sensor Replacement and Adjustment
The Authority22 Second Generation End of Lane Sensor is a Defuse
Reflective Sensor. The base is 2-1/8” long (55mm) and no adjustment is
necessary.
Replacing the 2nd
generation End-of-Lane Sensor
Tools needed:
Parts
needed:
- Replacement EOL sensor (Part Number 14-100235-000).
- Place
machine in transport position with the cover open and power supply
disconnected.
- Loosen
and remove nut at base of sensor.
- Remove
black O-ring from base of sensor.
- Disconnect
sensor cable from the quick-connect cable harness.
- Pull
sensor out from the top side of the machine and remove the second O-ring on top
side of the sensor.
- Place
an O-ring under the top-side nut and then install new sensor from top side of
the machine.
- Place
the second O-ring on the sensor pushing it up to the bottom side of the
mounting shield
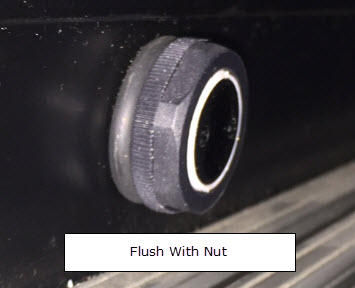
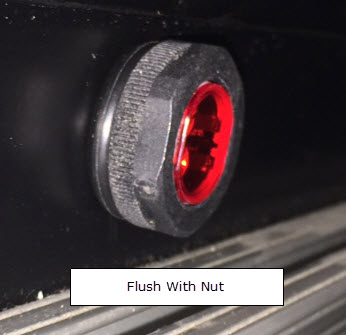
- Insert
and tighten nuts at base of sensor until the end of the sensor is just even
with the bottom edge of the lower nut.
*** Do NOT over tighten nuts ***
Adjusting the 2nd
generation End of Lane Sensor
There is no adjustment necessary for this type of End of
Lane Sensor. Check and make sure the sensor is operational by using the GUI and
navigating to the Maintenance > Diagnostics > Sensors screen. Check
the sensor by placing your hand under the sensor to check and see if the End
of Lane sensor button on the GUI screen is changing color state. If so the End
of Lane Sensor is working fine.
Authority22/Envoy
3rd Generation End of Lane Sensor Replacement and Adjustment
The Authority22 third generation End of Lane Sensor is a Defuse
Reflective Sensor. The base 1-1/4” long or 33mm and is adjustable.
Replacing
the 3rd generation End-of-Lane Sensor
Tools needed:
Parts
needed: Replacement EOL sensor (Part Number 14-100235-000).
- Place
machine in transport position with the cover open and power supply
disconnected.
- Loosen
and remove nut at base of sensor.
- Remove
black O-ring from base of sensor.
- Disconnect
sensor cable from the quick-connect cable harness.
- Pull
sensor out from the top side of the machine and remove the second O-ring on top
side of the sensor.
- Place
an O-ring under the top-side nut and then install new sensor from top side of
the machine.
- Place
the second O-ring on the sensor pushing it up to the bottom side of the
mounting shield
- Insert
and tighten nuts at base of sensor until the end of the sensor is just even
with the bottom edge of the lower nut.
*** Do NOT over tighten nuts ***
Adjusting the 3rd
generation End of Lane Sensor
This style End of Lane Sensor has an adjustable
sensitivity control that has been preset to the position shown below by
Brunswick. The range of this adjustment screw is 270 degrees (135 degrees to
either side of the position shown).
Do not force this screw more than 1/3 turn past
the position shown.
Sensitivity Control Operational Indicator
(Yellow) Power Indicator (Green)
This sensitivity control should result in a
steady signal (shown by the yellow operational indicator light) while the red
end of the sensor is within 4-6” of the lane or approach surface. This yellow
operational indicator light should turn off, indicating that the sensor has
gone past the pin deck end of the lane, if the lane surface is greater than 6”
from the red end of the sensor.
Note: The mounting nut
will cover the sensitivity control when the sensor is properly mounted on the front
of the lane machine. Also, make sure to re-use the black O-rings from the original sensor while installing the new sensor.
|
